tutorials

The Shot: Diamond Beach

Note: Only attempt this shot in fair weather and take precautions shooting near the waterline.

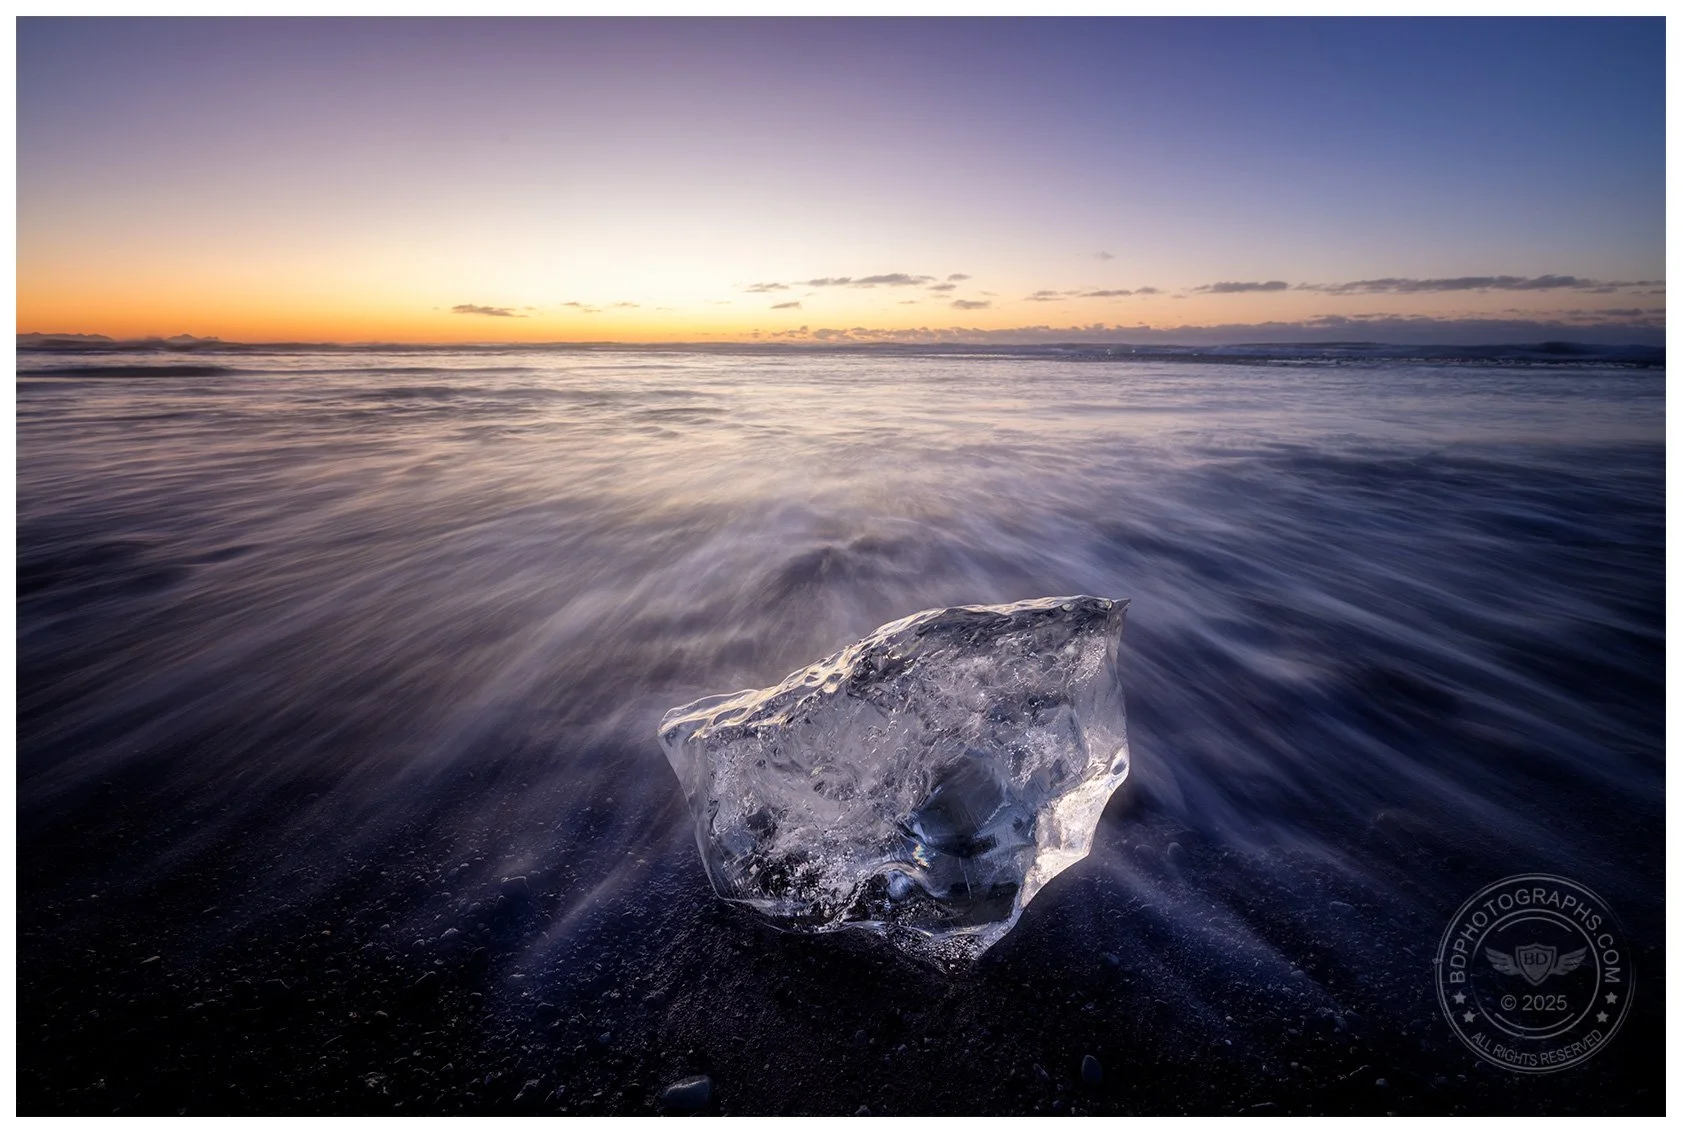
The Shot: Fiery Diamond

Location: Diamond Beach, Iceland

Skill Level: Intermediate

Techniques: Scouting and preparation, long exposure, shooting into the sun

Recommended knowledge: Setting your camera’s aperture, shutter speed, and ISO. Changing the autofocus point. 

The portfolio shot “Fiery Diamond”

15mm f/18 1/25” ISO 100

Iceland’s stunning landscapes are well known and frequently photographed: black sand beaches, volcanic gorges, massive glaciers, and impressive waterfalls; but arguably its most unusual and incredible location is Diamond Beach on the south coast. A perfect storm of natural confluences creates this phenomenon: as nearby Vatnajökull Glacier calves, ice sheddings accumulate in Jökulsárlón (also known as the Glacier Lagoon) and make the short journey to sea in a narrow estuary. The tides push ice chunks back up onto the shore, creating a beach littered with “diamonds”. 

(The icy bits on Diamond beach are not technically “icebergs” – even the largest chunks are way too small to fit the scientific definition – but they are commonly referred to in this way. Diamond Beach is sometimes called “Iceberg Beach”.) 

Diamond Beach gets its name from the chunks of ice that accumulate on the shore line. From the nearby Glacier Lagoon, ice drifts into the ocean and is swept back to shore by the tide. 

I had seen photos of Diamond Beach prior to my visit, so I already had an idea of what I wanted to achieve: early morning sunlight lighting the ice in gold, as the tide gently draped the black sand. In the event of overcast conditions, my backup goal was to shoot the most pristine “diamond” I could find under moody skies. I deliberately was not looking for the brilliant blue color of solid glacial ice (I would target this in other locations) – at Diamond Beach I specifically wanted a clean, clear, crystalline subject. Let’s have a look at how this came together: 

Diamond Beach during daylight hours is a crowded tourist spot. These times are helpful for scouting and preparation but more than likely won’t present the opportunity for a good image.

There are a few technical considerations for achieving this shot, but the most important element is preparation. I had the opportunity to scout the area in the afternoon a day prior to the actual shoot. The parking lot was filled with tourist buses and the beach was crowded with people, but I tempered my frustration knowing that at sunrise it would be much more manageable. I walked around the shoreline to get a sense of the area and the types of ice present, both large and small, “clean” and “dirty”. 

Not all chunks of ice are the same. Many people are drawn to the larger pieces, and while they are impressive, most often they are rough and not transparent. Others are partially dusted in black sand. These are not good subjects. I searched instead for a piece that was smaller and clear and found that the ideal subject is about the size of a toaster oven. Any smaller and the ice could be carried too easily by the incoming waves, ruining our shot. One advantage of a relatively small subject is that I could move it into position as needed. Normally in nature photography I take special care not to disturb the environment, but in the case of a small chunk of ice that will likely melt within a day or two, I have no ethical concerns. (This is more common than you think in landscape photography: If you’ve seen autumn waterfall images where a pristine fallen leaf is perfectly set on a nearby stone, I guarantee the photographer placed it there and staged it for the image – and there is nothing wrong with that! Remember, landscape photography is a fine art, not orthodox photojournalism). 

Not all ice is the same. Many people are drawn to the larger ice chunks like this one, but for this shoot I specifically avoided solid blue glacial ice and focused on finding a clear “diamond”

The next morning, I returned to Diamond Beach before sunrise. I walked to the edge and searched for a clean ice bit. Once I had identified my subject, I knew I would have to commit to it for the entire shoot. Light changes quickly when the sun peeks over the horizon – there simply would not be ample time to compose and shoot with additional subjects. 

Before I set my tripod into position, I observed where the waves broke and where the water met the sand. I opted for a 15-35mm wide angle lens set close to the subject to make it appear larger and more impressive, very similar to one of my favorite shoots a few years ago in Death Valley. This meant setting the camera very low to the ground and on the same vertical plane as the ice.

A daytime practice shot. Scouting is effectively a dress rehearsal for the sunrise shot.

As the water swept in toward the subject, I dialed in a slower shutter speed to capture the motion blur of the tide. I also kept a relatively narrow aperture with focus set on the face of ice nearest to the lens. ISO was the last consideration and set to achieve a slightly underexposed image. As the sun neared the horizon, I adjusted ISO levels down for the increasing ambient light. 

To achieve the sun star effect, I kept the aperture relatively narrow, at f/18. My Canon R5 has excellent dynamic range so I was able to capture this image with a single RAW file, underexposed by about 2 stops to preserve the detail in the sky. Most current full-frame cameras can do the same, but older cameras or models with less dynamic range might require additional exposures to achieve a similar result. 

As an alternative to the sunlit shot, I also sought an image highlighting a pristine diamond. This pre-sunrise shot emphasizes the soft water and clarity of the ice.

15mm f/11 0.4” ISO 100

Like many effective landscape images, planning and preparation heavily influenced the final result. An afternoon of scouting was invaluable in determining how to manage the different elements including the geography of the location, areas with the best ice, and behavior of the waves. 

Weather conditions also greatly affected the outcome – this shot would have been impossible in stormy weather. Which brings me to possibly the most important point: shooting very close to the ocean can be dangerous and it is critical to assess the risks before attempting this type of shot…

  • High winds or stormy seas increase the potential for dangerous waves and of you being swept into frigid waters. Always keep an eye on the waves and have a clear escape route behind you.

  • Large ice chunks are heavy and jagged, but they can easily be moved by strong winds and water – keep your distance. 

  • Photographic equipment low to the ground and close to rushing water is at high risk of being damaged or destroyed. Keep one hand on your camera / camera strap at all times.

  • Do not set your bag on the ground; keep it on your back or leave it in the car.

  • Assume you are going to get wet — wear proper waterproof footwear or have a second set of dry clothing and shoes waiting for you in the car. 

Tips for shooting at Diamond Beach

  • Visit the area and scout before shooting.

  • Pick a “diamond” and commit to it for the shoot. Move it into place if needed.

  • Tighten your aperture for a longer shutter speed (to create motion blur in the water) and to create a sunstar effect. F/16 or F/18 are preferred — try to avoid stopping down to the limit.

  • Do not use a UV filter and make sure your lens is clean. 

  • Set your tripod and camera on-level with the subject and focus on the details in the ice. 

Dolphin Photography

One of the common myths that I like to dispel in my role as a diving evangelist (yes, I preach to anyone who will listen, and many who won’t) is that there aren’t many opportunities for snorkelers to have amazing underwater encounters and photo opportunities. People typically limit their perception of snorkeling to a lazy glide over a tropical reef, but there’s so much more… In the first of the Extreme Snorkel Series, we travel to the Bahamas to share the ocean with the fast and playful Atlantic Spotted Dolphin. This is no gentle swim — the dolphins give us quite a workout as they interact with us and easily out-swim even the fittest of freedivers. Check out my tips and recommendations for dolphin photography in this episode.

And one more thing: although these awesome dolphin encounters are condensed into a fun 6-minute video, this was not an easy expedition. Photographing animals in the wild is nothing like going to an aquarium with guaranteed close-up sightings on demand. It took two visits to the Bahamas to obtain these images — the first time we got completely skunked due to high winds and choppy seas. I vowed to return a few months later and while we did get out to sea, one of the two days was nearly called off again due to winds. In any case, many photographers only showcase their successes, but behind every portfolio shot are numerous failures due to logistics, weather, bad lighting, or human error. No one likes going home empty handed with greater wisdom. We shouldn’t dwell on the negative, but we should acknowledge the difficulty, learn from mistakes, and savor the triumphs. So grab your sunscreen and let’s meet some wild dolphins!

Back In The Water ...

It’s been a year since I launched the BDPHOTOGRAPHS YouTube channel, with the goal of sharing the experience of photography, providing photo tips, and including filmmaking in my book of work. A year ago we kicked off with an adrenaline-packed shark photography adventure, and in this episode we return to the water to look at the fundamentals of underwater photography. We’ll meet giant mantas, big sharks, friendly turtles, and a variety of photogenic sea life. We’ll check out shallow sandbars, deep shipwrecks, and learn about the different gear needed to make it all happen — see below for some recommended items. Almost all of the footage is original and behind the scenes of real dive trips I have taken so I hope you’ll enjoy spending some time in the water with me. Once again, thanks for watching, and please subscribe! 

We go back into the water to photograph giant mantas, big sharks, friendly turtles, and haunting shipwrecks. In this video we'll learn the basics of underwat...


Interested in starting a website or blog? How about a place to display your photos online? I use Squarespace as my platform. Get started for free — click the image below.


Some links to underwater photo gear are below. It’s best to talk to a professional who has experience in the water with camera gear, not just a sales rep who knows the equipment.

Waterproof case for iPhone

ProShot Case for iPhone XR & iPhone 11 https://amzn.to/2KqEulz

ProShot Case for iPhone X & XS https://amzn.to/2VqRr57

ProShot Case for iPhone 8 Plus, 7 Plus, and 6 Plus https://amzn.to/2RWFLVM

Action Camera

Paralenz https://adorama.rfvk.net/odWjO

GoPro Hero 8 Black Edition https://adorama.rfvk.net/xdPA1

Compact Consumer Camera

SeaLife https://adorama.rfvk.net/OAJ6W

Pro Gear

Professional level gear is almost exclusively camera specific — housings are designed with controls aligned to the buttons and switches of individual camera models. Nauticam, Aquatica, Ikelite, and SeaCam are well-known manufacturers that offer custom underwater housings for popular DSLR and mirrorless cameras. They also offer strobes and related accessories. Once you invest in pro quality camera gear, I highly recommend insuring your gear — and make sure your policy includes an underwater rider; standard policies usually don’t cover taking your camera into the ocean!


If you’re interested in photography and supporting small business, check out Adorama

Introducing the BDPhotographs YouTube Channel

BDPhotographs is now live on YouTube! If you enjoy the content here, I’d encourage you to subscribe, like, and share, tell your neighbors, all that jazz… The channel will add a video dimension to the photography techniques and tips that I use in my images (without being long-winded and technical, I promise!) Often there are interesting stories behind the images — challenges, surprises, successes, and failures. Videos will also take viewers behind-the-scenes to see where, when, and how images are captured. I can’t think of a better way to kick off this new channel than to take viewers underwater with me to get up close and personal with my favorite animals — sharks! See a great hammerhead shark bite (and spit out) my camera in distaste. Come for the sharks, stay for the photos, and subscribe for the next video. Thank you!

The Shot: The Blizzard Taxi

The Shot: The Blizzard Taxi
Techniques: Panning
Skill Level: Intermediate
Location: New York City
Recommended knowledge: Setting your camera’s aperture, shutter speed, and ISO. Changing the autofocus mode and setting autofocus point. Enabling hi-speed or burst mode.

Focal length: 50mm, Aperture: F/2.8, Shutter: 1/40, ISO: 200

Focal length: 50mm, Aperture: F/2.8, Shutter: 1/40, ISO: 200

Even in depths of winter New York City just does not stop going. With this shot we’ll capture the action of New York in a snowstorm. The obvious subject is a moving taxi, but equally compelling is the falling snow and blustery weather. Shooting this image relies on the panning technique and using shutter speed as an artistic tool. We’ll frame color against a neutral background and washout the canvas with a vignette to further draw the eye to the main part of the image. 

SHUTTER SPEED
If you have a strong understanding of shutter speed feel free to skip this section. If this is new to you or you’d like a refresher, let’s review: the shutter speed of the camera controls how long the shutter is open to allow light to travel in to the camera’s sensor. The longer the shutter speed, the more light enters the frame. If the shutter speed is too fast, not enough light enters and the photo is underexposed; too slow, and the photo will be overexposed. When you photograph a stationary scene, shutter speed affects only the exposure and does not impact the appearance of the subject. 

Shutter speed can also be used to control the appearance of motion in an image. A fast shutter speed will “freeze” motion and appear as a crisp moment in time. With a slow shutter speed, motion will appear more fluid and blurry. In a very long exposure, motion may appear as a trail, or may disappear completely from the frame. All of these shutter speeds have applications in photography depending on the desired effect. In this image, the goal is to capture motion with a moderate blur. If we were to hold the camera stationary (or use a tripod) using a medium shutter speed, the passing taxicab would appear blurry against a sharp background as the camera captures a short distance of motion. However, in this image, using the panning technique we will reverse the effect by capturing the taxicab sharply and blurring our background. This is a popular look in auto racing and sports photography. It’s also common in nature photography, especially for birds in flight. As a bonus, the shutter speed will also blur and illustrate the movement of the falling snow.

PANNING 
Panning is not difficult, but it takes practice and requires an understanding of shutter speed to give the desired results. To illustrate what we will accomplish with panning, let’s use a simple example. Hold a pen or pencil at eye level, about 8-12 inches diagonally in front your right ear. Look straight ahead and take note of what is in the background (it could be a wall in your home). Now continue to look straight at the background ahead and move the pen across from right to left so that it stops 8-12 inches diagonally in front of your left ear. The entire motion should take 1 to 2 seconds. Notice that the pen appears blurry and the background remains sharp. This is what a medium shutter speed would capture when the camera is stationary - for example a camera on a tripod as a taxi cab passes from right to left.  (If you find that the pen was sharp and the background was blurry you’ve unknowingly used the panning technique. Let’s try it officially now.)

The traditional use of shutter speed to create motion blur. In this image, the camera is stationary on a tripod, keeping our background still while blurring moving subjects. In panning, the opposite effect is achieved. I used a tilt-shift lens in th…

The traditional use of shutter speed to create motion blur. In this image, the camera is stationary on a tripod, keeping our background still while blurring moving subjects. In panning, the opposite effect is achieved. I used a tilt-shift lens in this shot, but any lens can achieve motion blur at the right shutter speed.
Focal length: 24mm, Aperture: F/14, Shutter: 1/15, ISO: 100

Now we are going to reverse the effect. Hold the pen at a diagonal 8-12 inches from your right ear at eye level. This time, turn your head to the right so that you are looking directly at the pen. Move the pen from right to left, just as before but this time follow the pen by turning your head at the same speed so that you are always looking straight at the pen as it moves. Notice the pen remains in focus as the background appears blurry throughout the movement. We apply this effect to our photo by moving our eyes (camera) with the the subject (taxi). 

Panning works most effectively when a subject is moving perpendicular to your frame of reference (i.e. side to side). What is the optimal shutter speed to achieve this effect? The answer really depends on two things: the focal length and the speed of the subject. Both of these factors affect how quickly motion appears in frame. To keep it simple, lets assume a focal length of 35mm on a full frame camera. A shutter speed between 1/30 and 1/125 generally works for passing cars, bikes, etc. In this photo the taxi is driving relatively slowly (as one should in a blizzard!); I used a Canon EF 24-70 f/2.8L II lens with a focal length of 50mm and shutter speed 1/40. As a bonus, the taxi is driving upwind and in the opposite direction of the falling snow. This adds an enhanced sense of movement to the image.

The easiest way to practice panning is to stand on a sidewalk and photograph passing cars. If your camera supports burst mode or hi-speed shooting you should enable this setting. Select Shutter Priority or Manual mode and start with a shutter speed of 1/60. Hold your camera at eye level and tuck your elbows in against your sides. (You can also use a tripod and panning head, but I suggest learning to do this hand-held). As a car approaches from the side, turn your entire torso toward the car, focus, and begin turning your core as the car passes. Practice turning your body at a speed so that the car remains in the same part of the frame throughout. Do this a few times before taking any shots. When you are ready, pan and hold down your shutter button to take multiple shots as a car passes. Be sure to press your shutter button before the subject is directly in front of you - you'll miss the shot if you wait until the subject is in front of you to begin shooting. The goal is to have the car in focus and the background blurry. If both appear relatively sharp, your shutter speed is too fast. If both are blurry your shutter speed may be too slow. If the car’s position in the frame is inconsistent, you need to fine tune the speed at which you're  turning. Panning is a complex technique that will take practice, so don’t be discouraged if it takes a while. One final note of caution: always pick a safe place from which to attempt this technique. Do not stand in the street and always be aware of your surroundings! 

Want to learn more about motion blur? Check out these 10 Great Tips to Capture Unique Motion Blur Photos.

FOCUS
On my Canon 5D Mark III you have three options: One Shot, AI Focus, and AI Servo. Comparable Nikon models have similar modes. If you are panning against a busy background, using Servo mode will be effective if you lock focus on the moving vehicle properly. I often use One Shot mode and have no problem. The key is to not enable all focus points. Doing so could cause the camera to lock focus on another moving object and not your preferred subject. Limit the autofocus to no more than a few points surrounding the center of the frame.

Limit your autofocus to the points in the center of the frame. Enabling more focus points could confuse the camera's autofocus and lock onto the wrong subject, especially in an action scene. (Image courtesy: Canon USA)

Limit your autofocus to the points in the center of the frame. Enabling more focus points could confuse the camera's autofocus and lock onto the wrong subject, especially in an action scene. (Image courtesy: Canon USA)

COMPOSITION
Whenever you capture motion, the framing of the subject should help to accentuate the movement. In practical terms, you should leave room in front of and behind the subject to imply movement, sometimes with visible cues like a wake or a dust cloud. (Think of cartoons and how they suggest movement). Generally you should leave more room in front of the subject than behind to imply forward movement. 

POST-PROCESSING
In post-processing I applied two effects to achieve the final look. First, I applied a polarization filter (using Nik Collection Polarization) to make the yellows and blues pop. Second, I added a vignette to draw the eye to the center of the frame. Vignettes can be created in a number of ways and normally they darken the corners of the image, however in this instance I used a curves adjustment layer in Photoshop to lighten the corners and reduce contrast. I limited the effect to the perimeter of the image, creating a fade into the whiteout of the snow storm. 

OTHER SUBJECTS
Panning can be used to capture motion on almost any moving subject but requires certain qualities in the movement:

  1. The subject should be moving perpendicular to you - i.e left-right or right-left

  2. The subject should be moving continuously and smoothly

Practice and have fun! Try the panning technique in these situations:

  • A cyclist at the park

  • A seagull at the beach

  • A motorcycle or car on the street

  • A runner in a race

  • A waverunner or water-skier at a lake

Panning technique in Taipei, Taiwan. Scooters are so popular in this city, they are often seen driving in “swarms” or parked by the dozens.  Focal length: 70mm, Aperture: F/2.8, Shutter: 1/200, ISO: 250

Panning technique in Taipei, Taiwan. Scooters are so popular in this city, they are often seen driving in “swarms” or parked by the dozens.
Focal length: 70mm, Aperture: F/2.8, Shutter: 1/200, ISO: 250