New York City

The Aurora Strikes Back!

On October 10, 2024, as predictions of a strong geomagnetic storm played out, sightings of the northern lights (aka aurora borealis) were reported throughout continental Europe in places that do not normally witness this amazing phenomenon. It became apparent that we were in for a treat in the US too. 

Five months earlier an unusually strong solar storm dazzled much of the temperate and even tropical latitudes with amazing auroras — in the US, the northern lights could be seen as far south as Florida! Unfortunately, while that spectacle unfolded, I was in Utah under overcast skies and unable to witness the magic. Earlier in the year I photographed the aurora over snow-covered fjords in Norway, so I was especially excited, and then disappointed, at the missed opportunity much closer to home. 

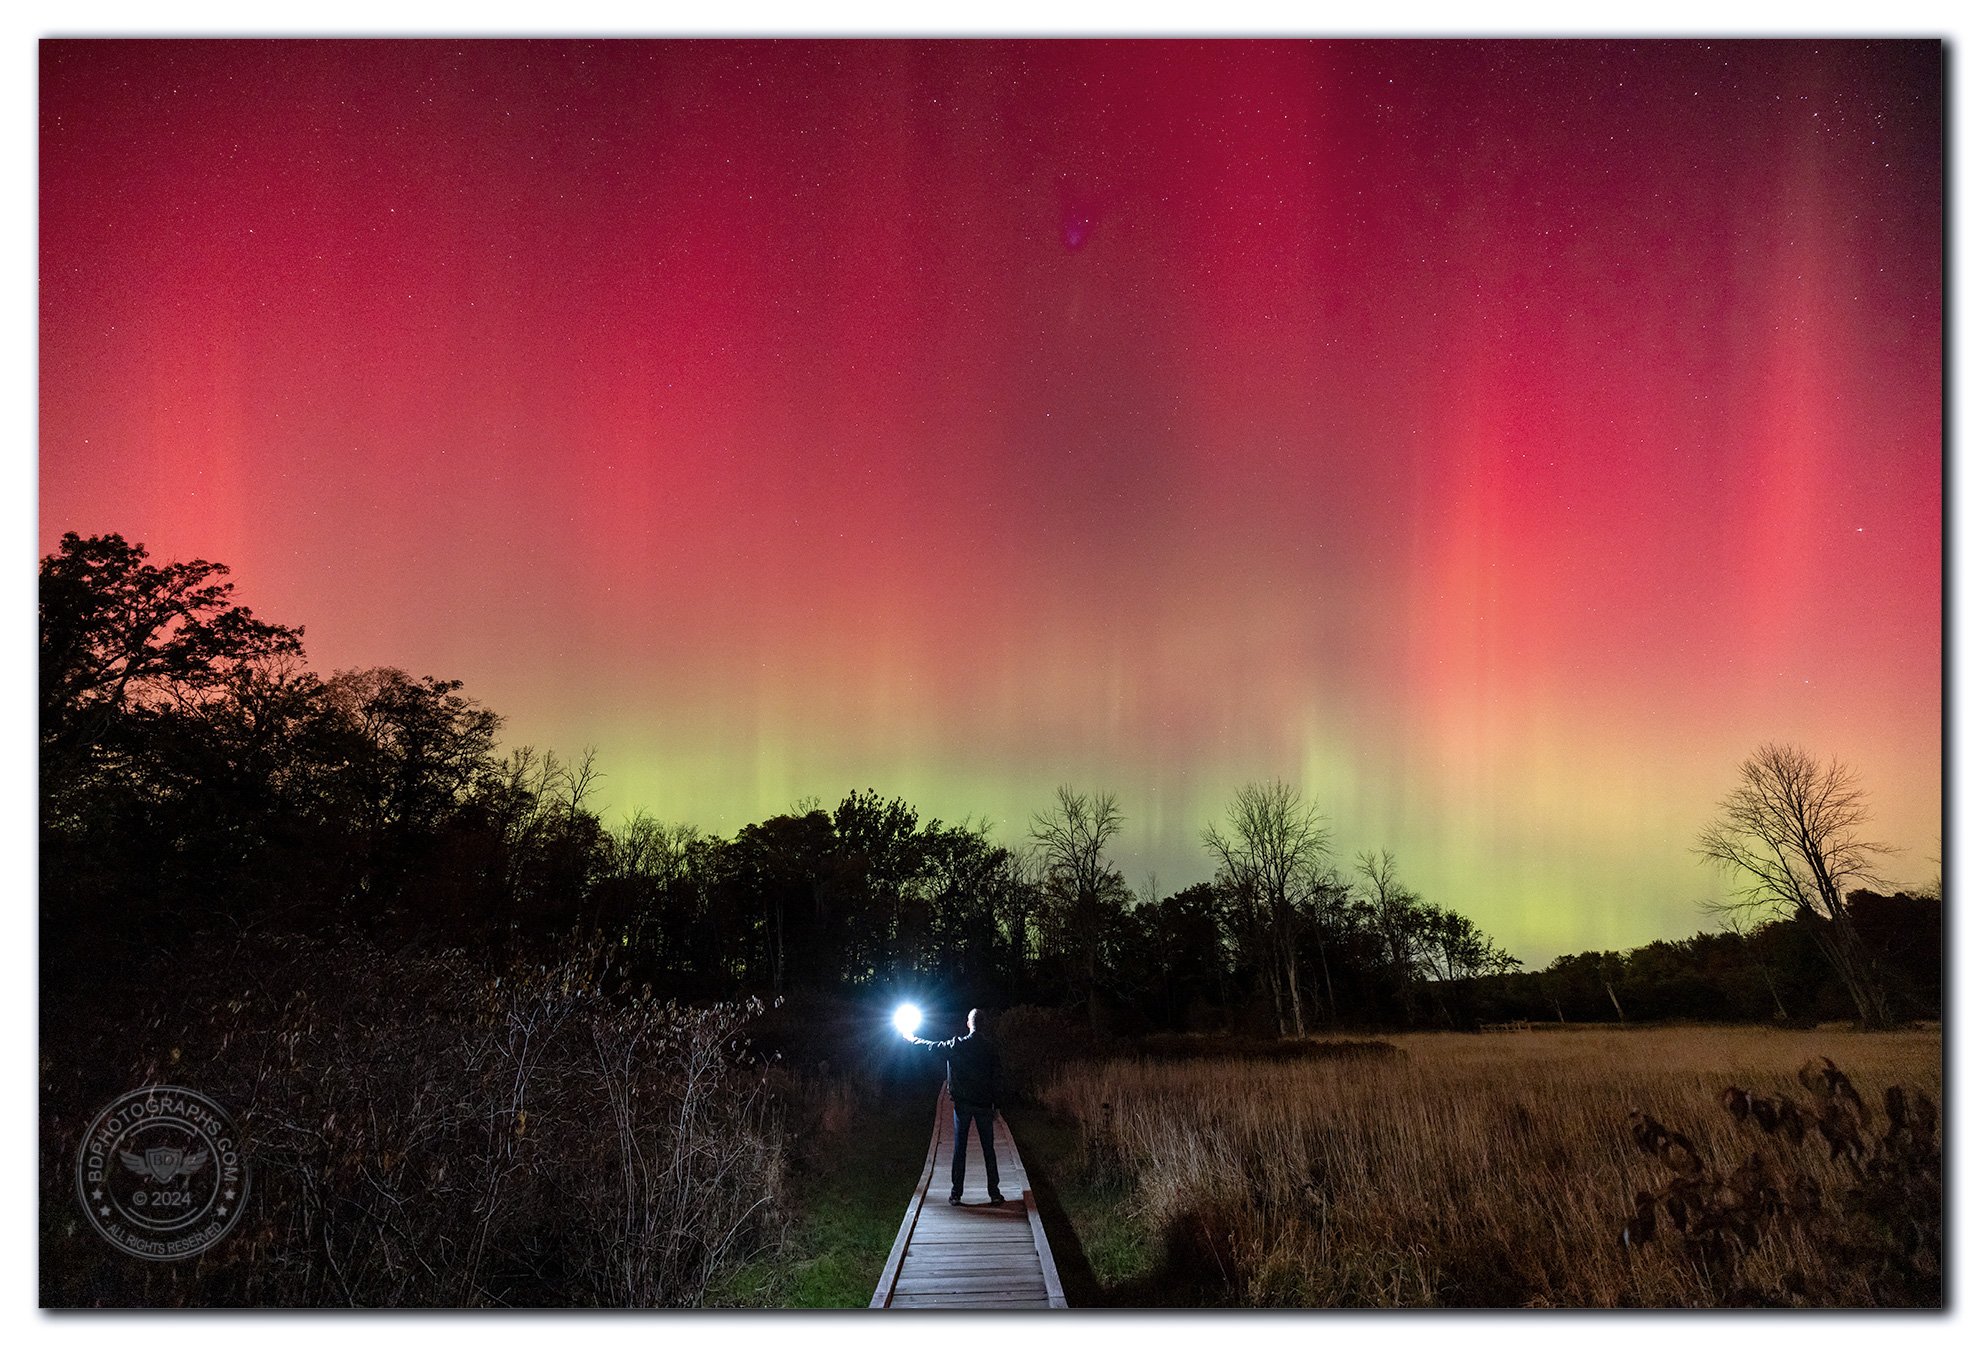
I photographed this “astro-selfie” in New Jersey under an incredible aurora borealis

As the October solar storm developed, I made preparations to shoot after sunset. The weather forecast called for clear skies — an auspicious start to the evening. In the New York City area it is difficult to find truly dark skies: the best options are usually the beaches of Long Island or the Jersey Shore, but those face south and east … 

So I traveled 45 miles northwest of Manhattan to a section of the Appalachian Trail that features a raised boardwalk over marshy grasslands. The trail snakes around a valley in the New York-New Jersey Highlands region, near the border of the two states. I chose this area for its meandering path and largely open field, providing multiple viewpoints and alignments in different directions. 

I arrived at about 9:00 PM to a crisp 45ºF. Here is how the aurora developed that evening: 

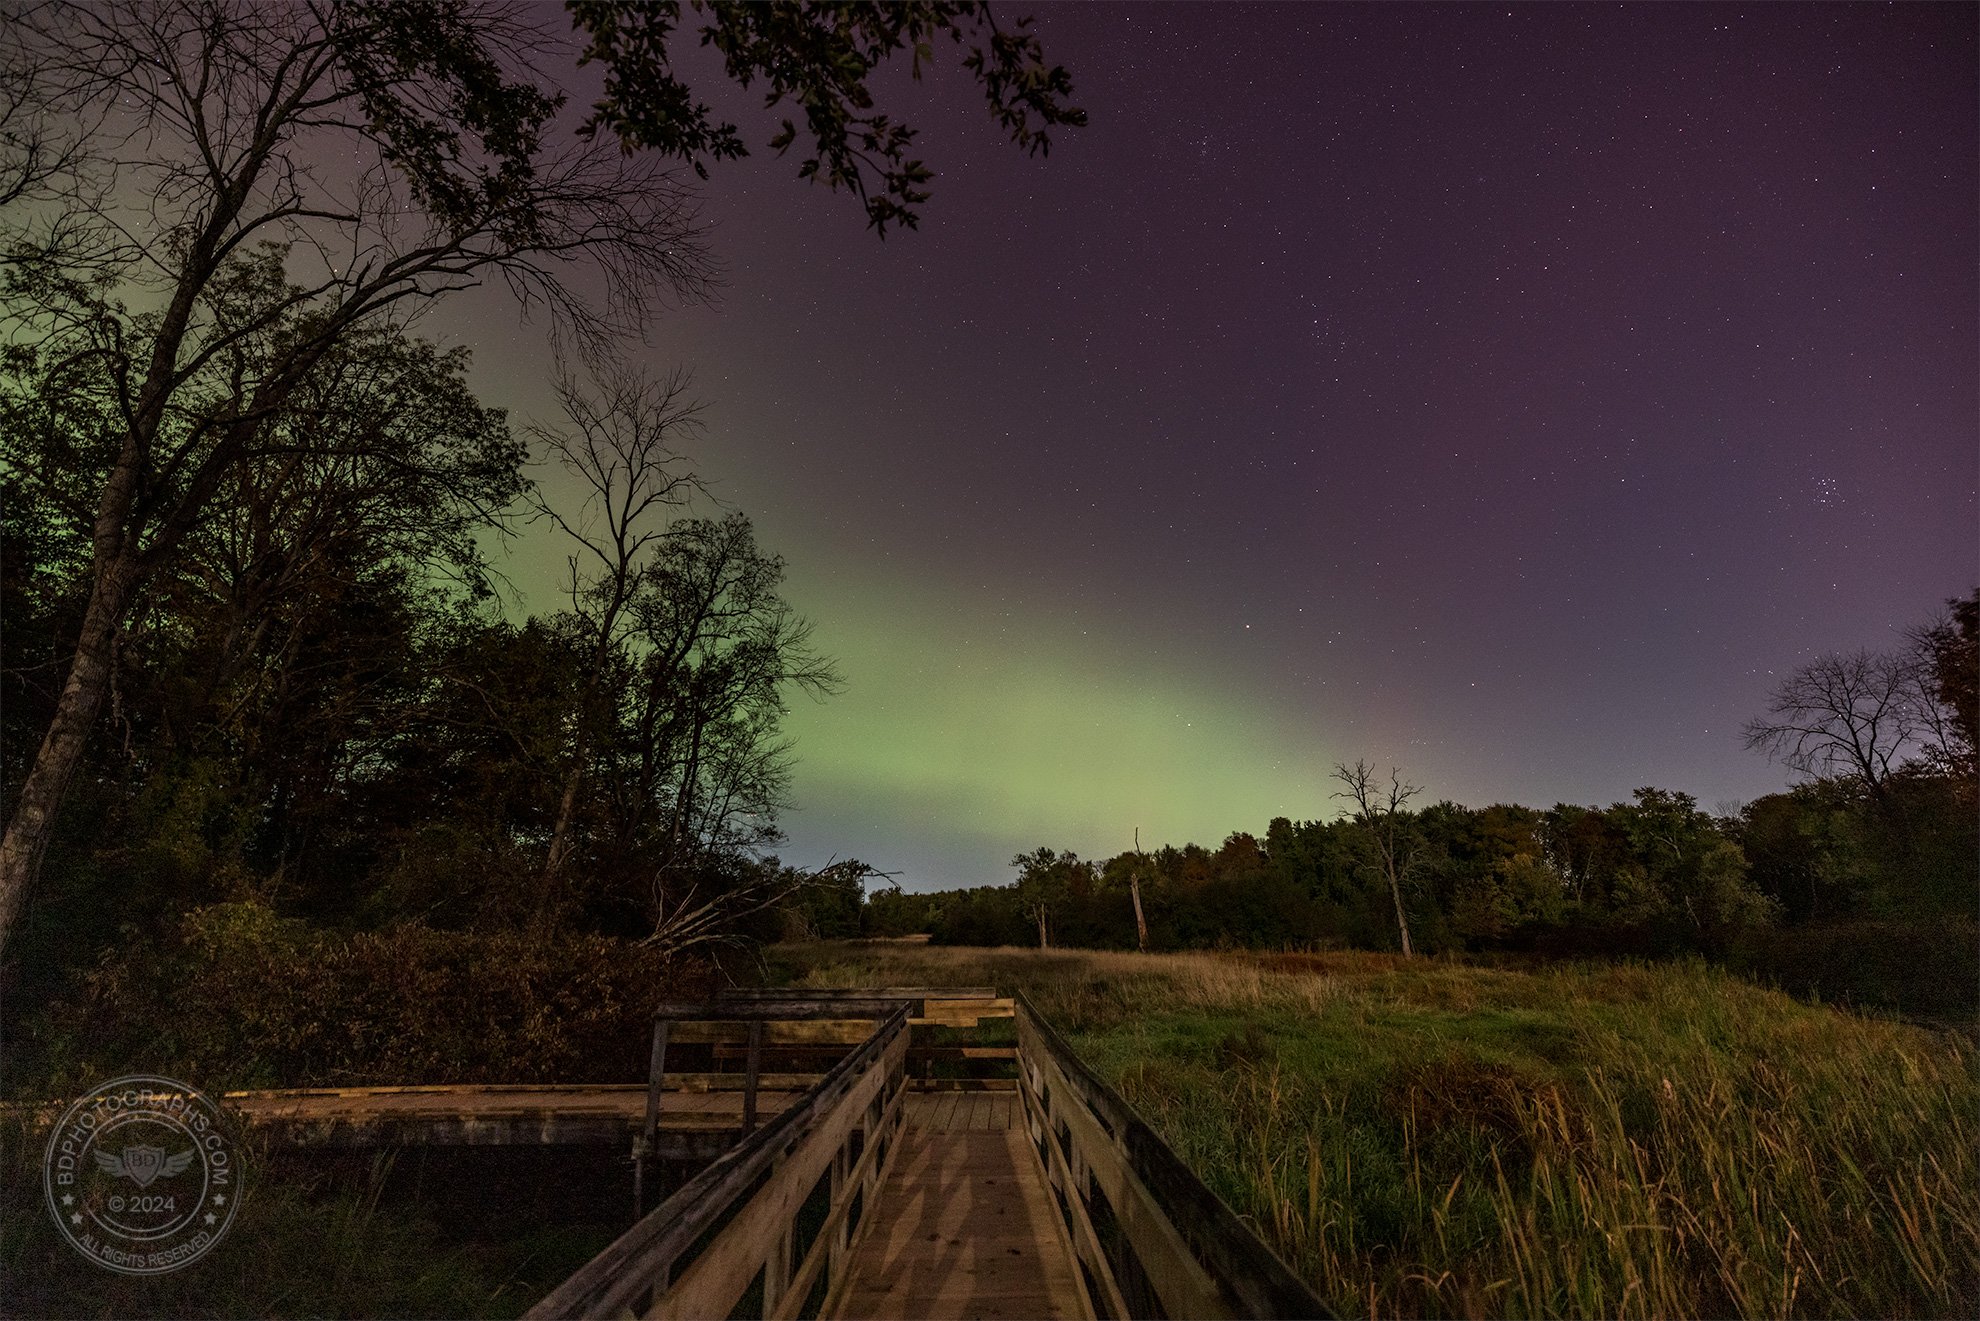
At first just a hint of green to the northwest. Truthfully, I would have been happy with this, but there was more to come…

More color looking northeast

Green and purple later on. The setting quarter moon behind me was so bright it cast shadows across the boardwalk.

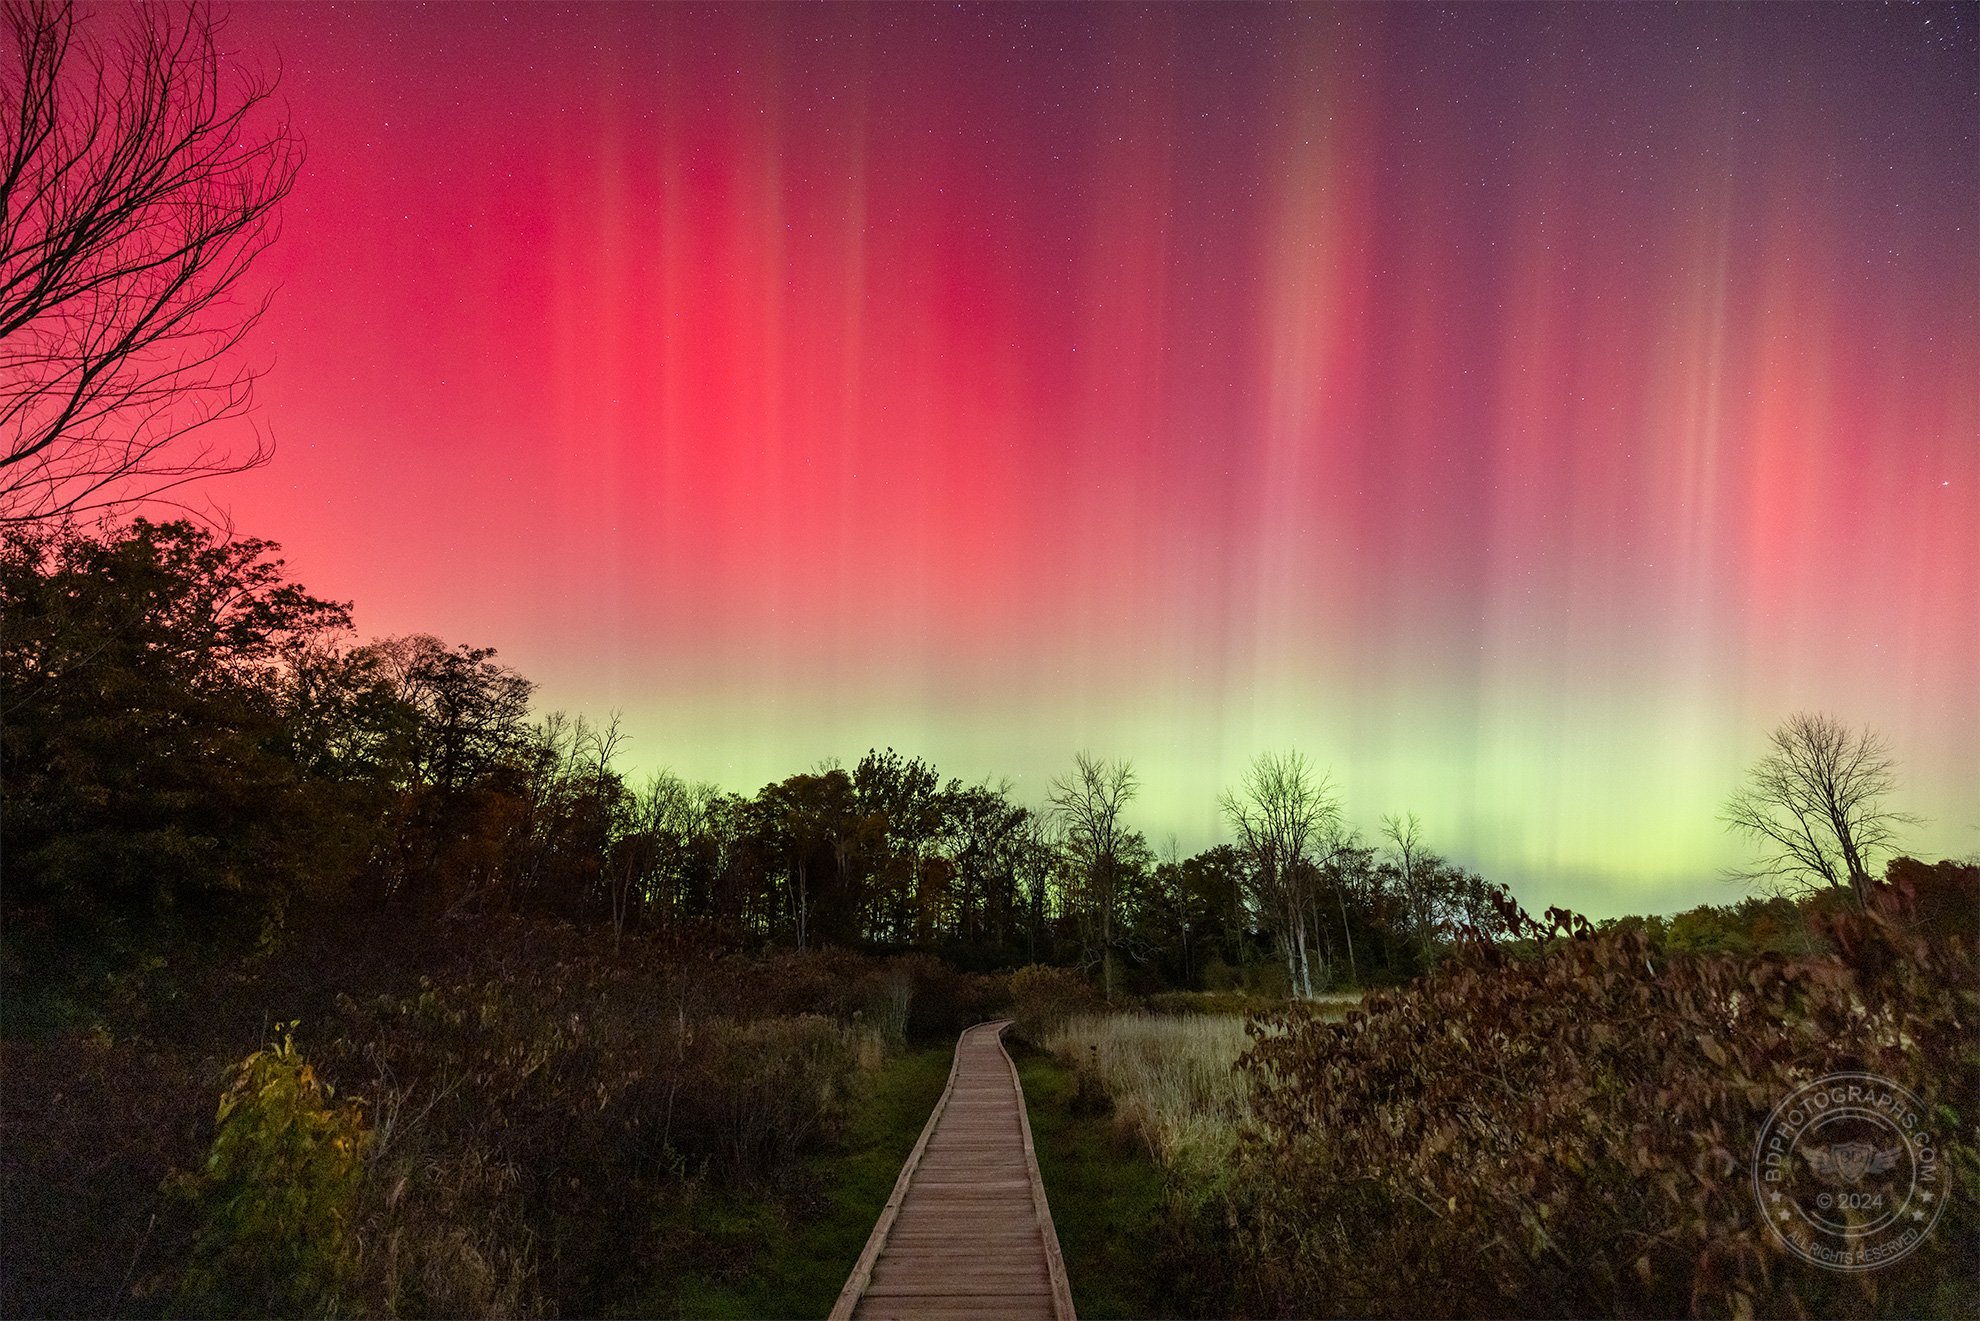
Showtime! A substorm flared up shortly after 10 PM. Moments after I captured this image, I set up for the “astro-selfie” at the beginning of this blog.

Some have asked me what the aurora looks like to the naked eye. Surely it cannot be as brilliant and saturated as these images, right? And the answer is yes, that is true of most celestial bodies and cosmic events, except perhaps for the moon. Nonetheless the aurora is very much visible to the naked eye and the colors and textures readily apparent. There’s no way we can see light the same way as a long camera exposure, but that doesn’t diminish the incredible experience of witnessing the northern lights. 

Approximation of what the human eye sees (left) versus the camera (right)

I shot this event with my Canon EOS R5 camera body stacked with a wide-angle RF 15-35mm F/2.8L lens. For a vast night sky, a wide field of view is the preferred choice, so most images were shot at the widest 15mm. 

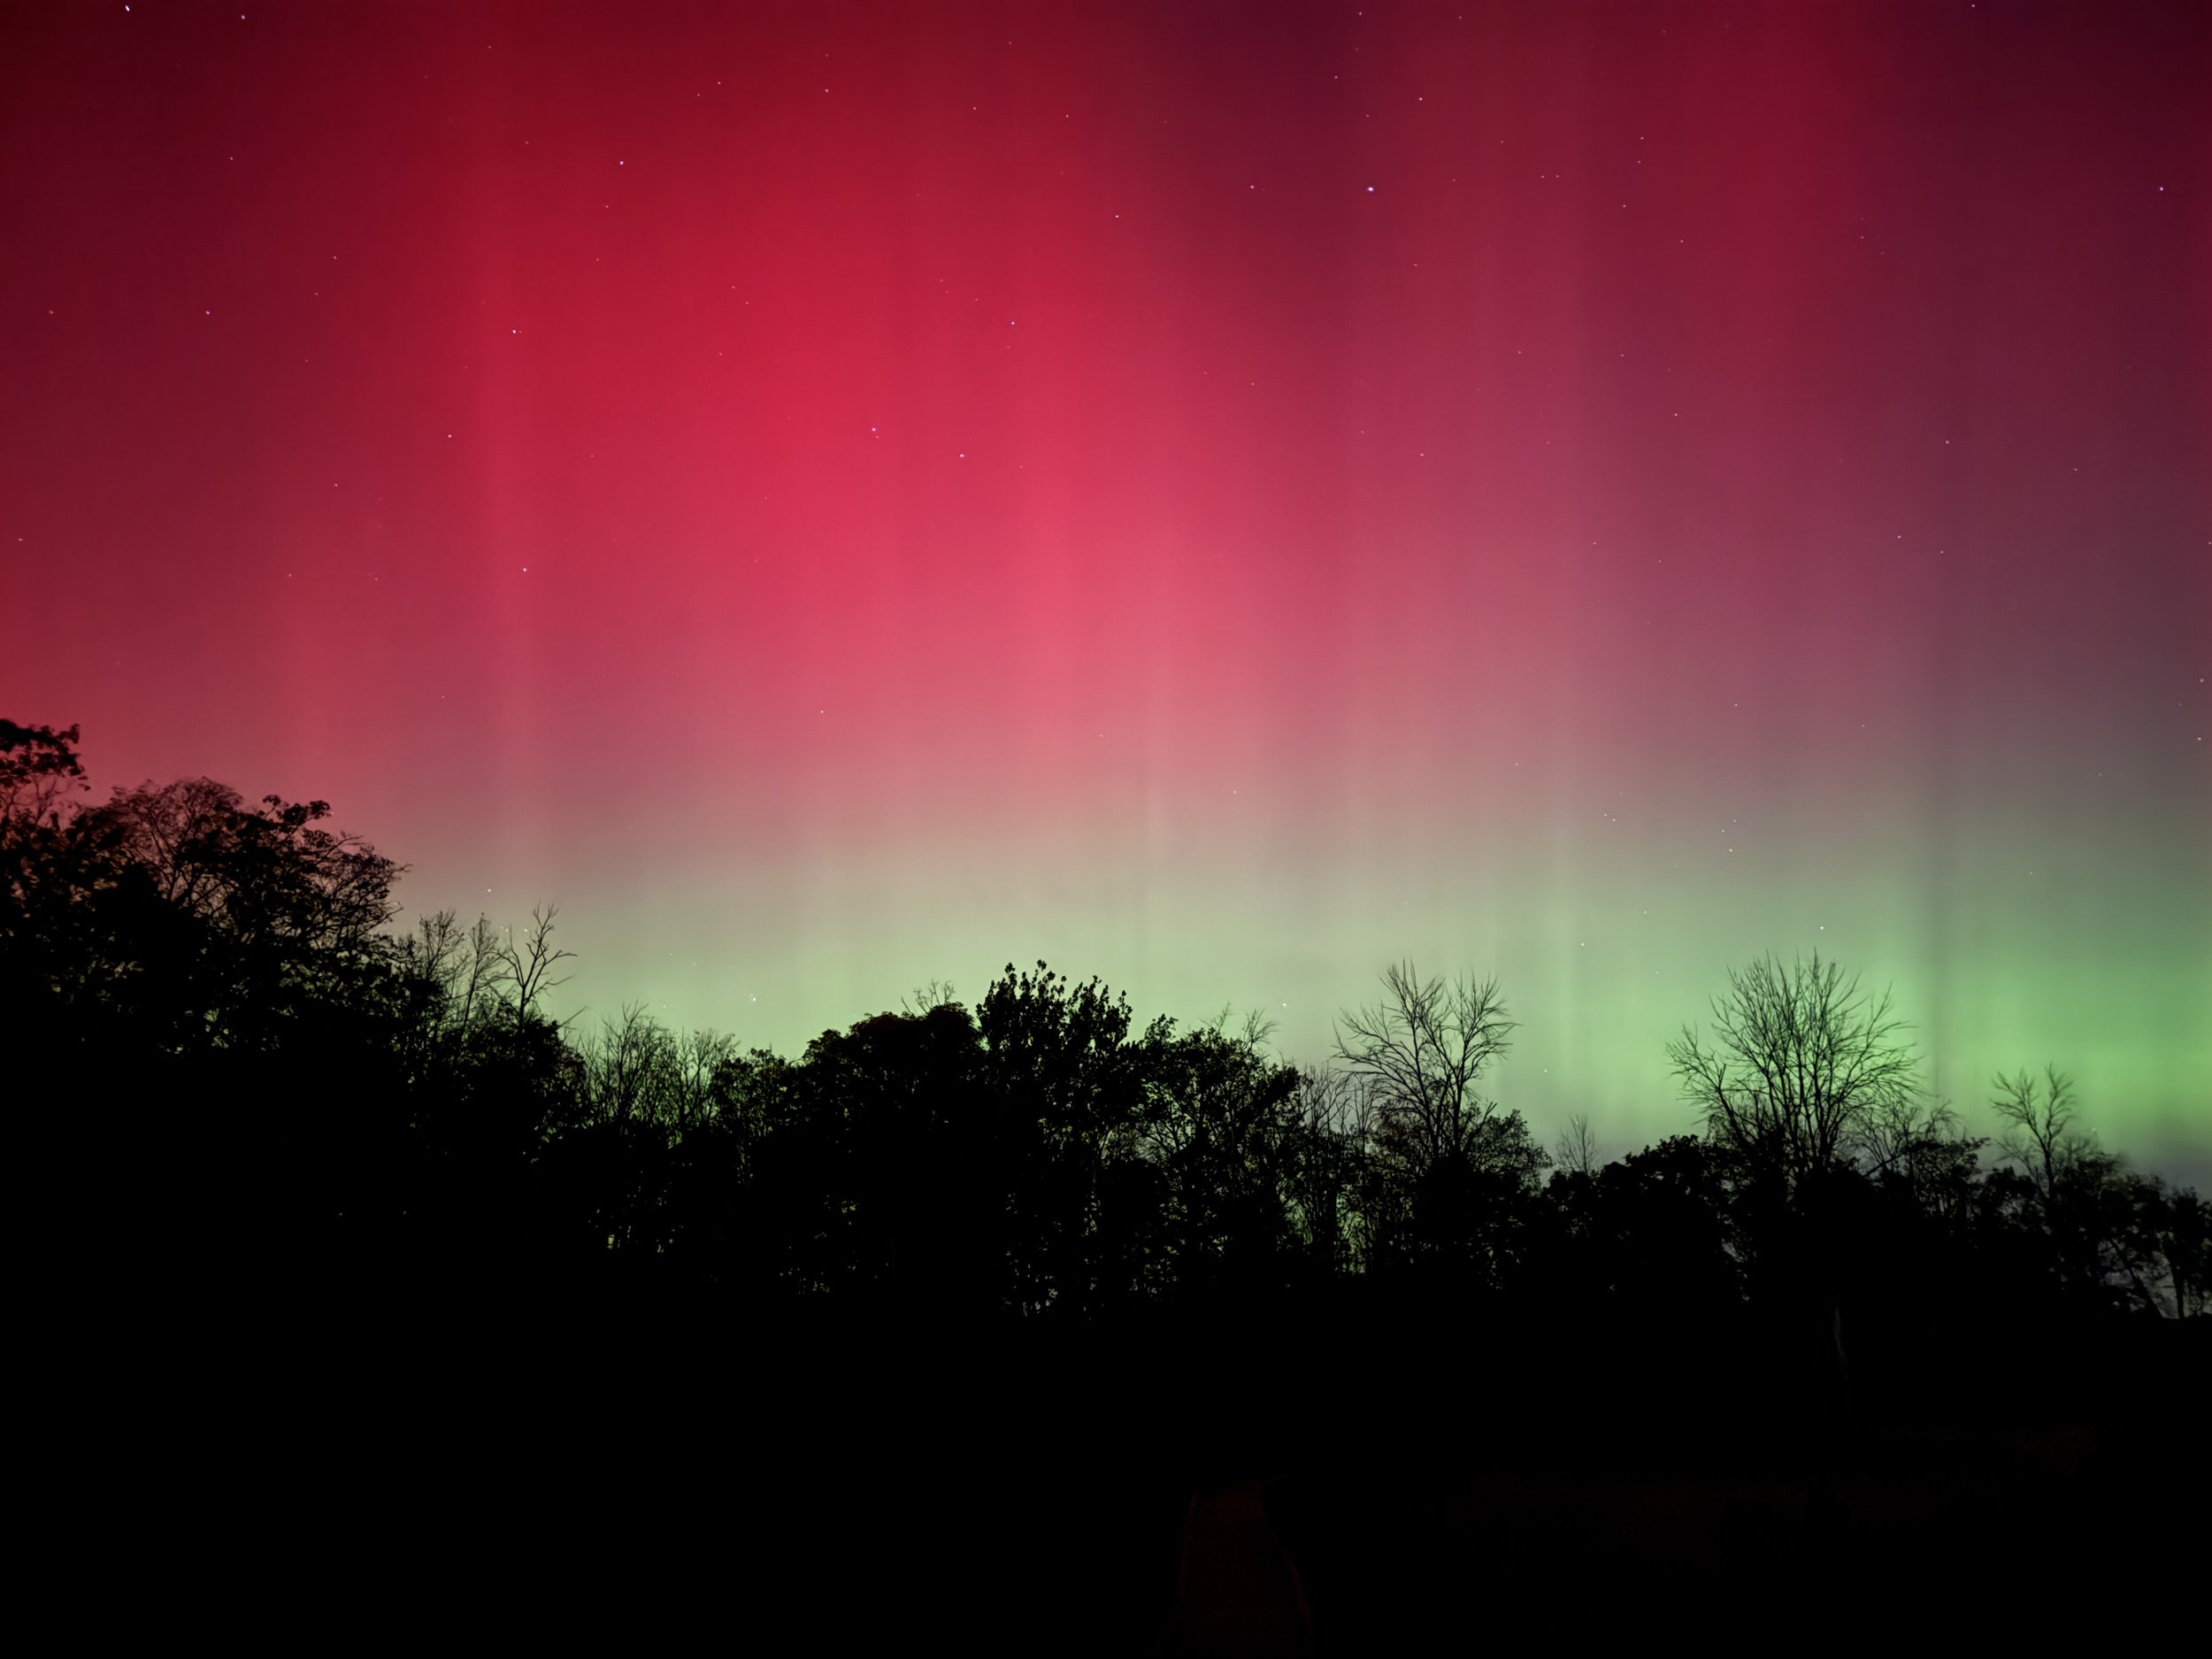
You don’t need an expensive camera to photograph the aurora, however. Many smartphones released in the last few years are packed with impressive optics. This image was photographed with my iPhone 15 Pro. 

Fingers crossed for another aurora event sometime soon. And for clear skies to see it.
Twinkling Lights

The holiday season truly is a magical time of year to visit New York City. You’ll be hard-pressed to find a more festive city between Thanksgiving and New Year’s Eve (though I don’t recommend ambling anywhere near Times Square on December 31st). The most famous displays are in store windows along Fifth Avenue in Midtown, and the centerpiece is of course the tree-helmed ice rink at Rockefeller Center. There are many more commercial displays throughout the city, but some of my favorites to photograph are the ones put up by resident New Yorkers outside their homes. Manhattan doesn’t have the space for giant lawn fixtures, but that doesn’t stop it from having truly elegant Christmas decorations in many neighborhoods.

The Upper East Side of Manhattan has some of the most elegant displays in front of beautiful townhouses.

Photographing holiday lights is a simple task for most: the display is a stationary subject you can easily capture with a phone camera. But producing a high quality image is trickier than you might think. My first step is to find the right subjects — generally I find the Upper East Side of Manhattan to have the best residential holiday displays in the city. (If you want a more extravagant but suburban display visit the Dyker Heights neighborhood in southern Brooklyn — it is famous for its Christmas decorations.)

Another beautiful Upper East Side display.

I recommend a wide angle lens (mine is a tilt-shift 17mm) on a full frame camera. One challenge is that most streets in New York are lined with parked cars, so photographing from across the street means you’ll have a row of ugly vehicles in your shot). There isn’t much alternative to setting up on the narrow sidewalk right in front of your subject, or just off to one side — thus the need for a wide angle point of view.

I’ve seen photographers shoot in daylight, but holiday lights often are not switched on until dusk. I prefer evening and nighttime images. Since we’re relying on artificial but ambient light from the displays, streetlights, or home lighting, we require a relatively long exposure: anywhere from half a second up to 30 seconds. A tripod is a must with these long shutter speeds.

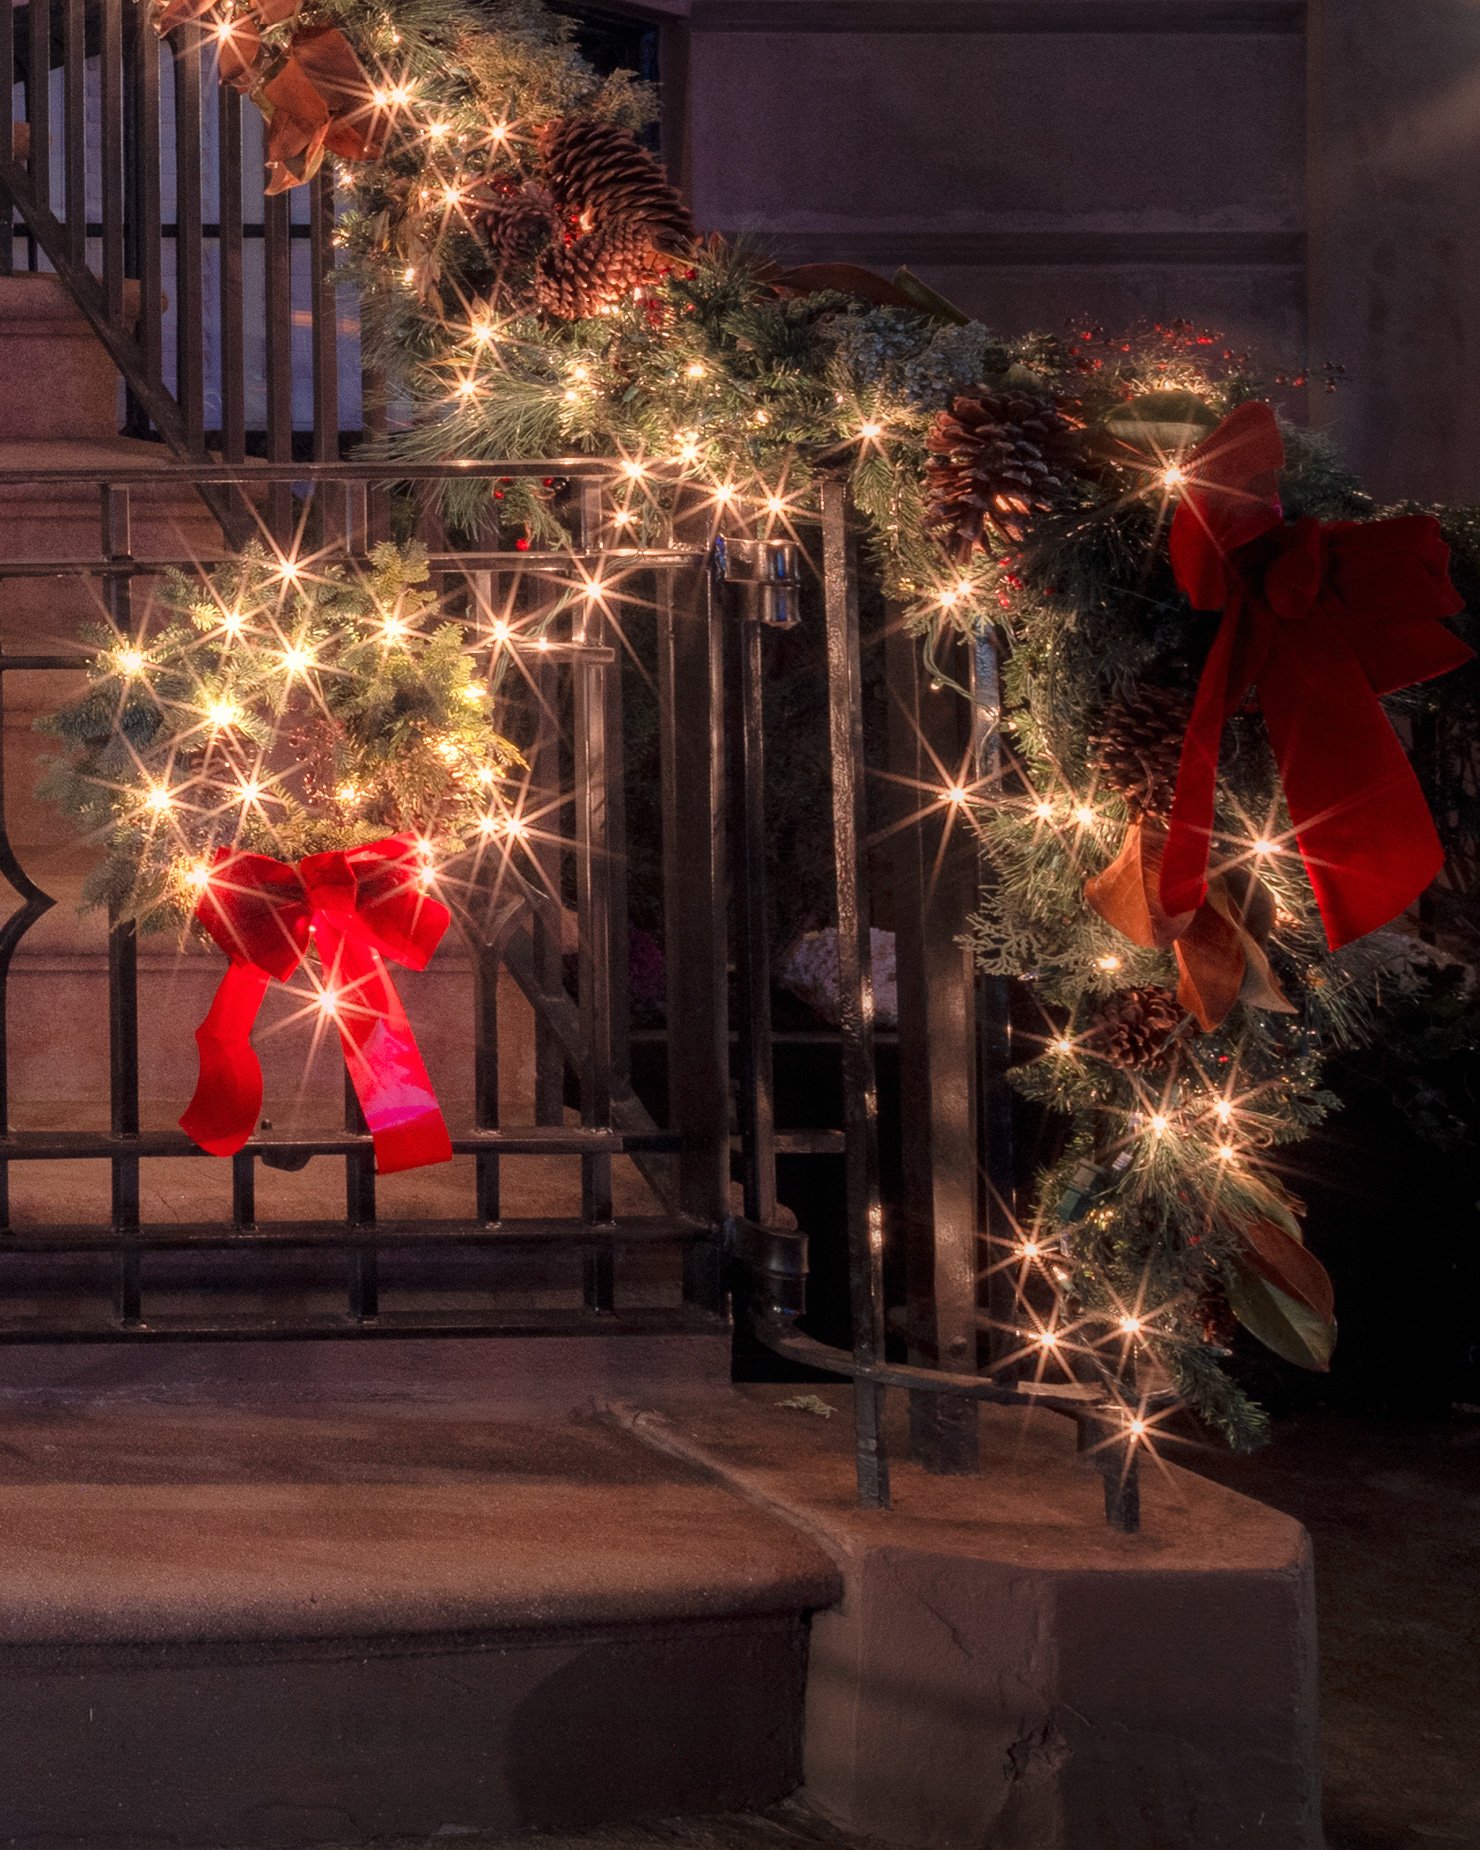
My favorite technique is to “stop down” or tighten the aperture to a narrow range, usually f/16. Narrow apertures on wide angle lenses produce brilliant “starburst” renderings of bright lights by effectively forcing the camera to “squint”. This creates a twinkling of the lights for an added magical touch to the subject matter. 

The tradeoff to a narrow aperture is that it increases the required exposure time and potentially the ISO.

“Twinkling” lights or starburst effects are achieved by stopping-down (i.e. narrowing) the aperture to f/16 or less.

While a 25-or 30-second exposure is not a problem for a tripod-mounted camera, if there is even a trace of wind it will cause motion blur on any moving elements in the image (tree branches, or loose hanging ornaments.). Therefore it’s best to shoot on calm evenings with low wind. You can increase the ISO to help bring down the exposure time, just remember that higher ISO produces more noise and reduces image quality.

Lastly, exposure for holiday lights can be tricky. I typically underexpose my image by about two-thirds stop or even a full stop to avoid blowing out the bright highlights. In post processing, I raise the shadows and increase exposure to bring out the background and low-lit areas. I also apply vignetting and selective dodging and burning to draw the eye toward the subject. For a dreamy look I sometimes apply a minor Orton effect. Lastly, I use a selective color filter to tilt the greens toward the cool side — think blue fir tree — for a more wintry look.

Use a selective color filter to tilt the greens toward the cool side for a more wintry look.

The Shot: The Blizzard Taxi

The Shot: The Blizzard Taxi
Techniques: Panning
Skill Level: Intermediate
Location: New York City
Recommended knowledge: Setting your camera’s aperture, shutter speed, and ISO. Changing the autofocus mode and setting autofocus point. Enabling hi-speed or burst mode.

Focal length: 50mm, Aperture: F/2.8, Shutter: 1/40, ISO: 200

Focal length: 50mm, Aperture: F/2.8, Shutter: 1/40, ISO: 200

Even in depths of winter New York City just does not stop going. With this shot we’ll capture the action of New York in a snowstorm. The obvious subject is a moving taxi, but equally compelling is the falling snow and blustery weather. Shooting this image relies on the panning technique and using shutter speed as an artistic tool. We’ll frame color against a neutral background and washout the canvas with a vignette to further draw the eye to the main part of the image. 

SHUTTER SPEED
If you have a strong understanding of shutter speed feel free to skip this section. If this is new to you or you’d like a refresher, let’s review: the shutter speed of the camera controls how long the shutter is open to allow light to travel in to the camera’s sensor. The longer the shutter speed, the more light enters the frame. If the shutter speed is too fast, not enough light enters and the photo is underexposed; too slow, and the photo will be overexposed. When you photograph a stationary scene, shutter speed affects only the exposure and does not impact the appearance of the subject. 

Shutter speed can also be used to control the appearance of motion in an image. A fast shutter speed will “freeze” motion and appear as a crisp moment in time. With a slow shutter speed, motion will appear more fluid and blurry. In a very long exposure, motion may appear as a trail, or may disappear completely from the frame. All of these shutter speeds have applications in photography depending on the desired effect. In this image, the goal is to capture motion with a moderate blur. If we were to hold the camera stationary (or use a tripod) using a medium shutter speed, the passing taxicab would appear blurry against a sharp background as the camera captures a short distance of motion. However, in this image, using the panning technique we will reverse the effect by capturing the taxicab sharply and blurring our background. This is a popular look in auto racing and sports photography. It’s also common in nature photography, especially for birds in flight. As a bonus, the shutter speed will also blur and illustrate the movement of the falling snow.

PANNING 
Panning is not difficult, but it takes practice and requires an understanding of shutter speed to give the desired results. To illustrate what we will accomplish with panning, let’s use a simple example. Hold a pen or pencil at eye level, about 8-12 inches diagonally in front your right ear. Look straight ahead and take note of what is in the background (it could be a wall in your home). Now continue to look straight at the background ahead and move the pen across from right to left so that it stops 8-12 inches diagonally in front of your left ear. The entire motion should take 1 to 2 seconds. Notice that the pen appears blurry and the background remains sharp. This is what a medium shutter speed would capture when the camera is stationary - for example a camera on a tripod as a taxi cab passes from right to left.  (If you find that the pen was sharp and the background was blurry you’ve unknowingly used the panning technique. Let’s try it officially now.)

The traditional use of shutter speed to create motion blur. In this image, the camera is stationary on a tripod, keeping our background still while blurring moving subjects. In panning, the opposite effect is achieved. I used a tilt-shift lens in th…

The traditional use of shutter speed to create motion blur. In this image, the camera is stationary on a tripod, keeping our background still while blurring moving subjects. In panning, the opposite effect is achieved. I used a tilt-shift lens in this shot, but any lens can achieve motion blur at the right shutter speed.
Focal length: 24mm, Aperture: F/14, Shutter: 1/15, ISO: 100

Now we are going to reverse the effect. Hold the pen at a diagonal 8-12 inches from your right ear at eye level. This time, turn your head to the right so that you are looking directly at the pen. Move the pen from right to left, just as before but this time follow the pen by turning your head at the same speed so that you are always looking straight at the pen as it moves. Notice the pen remains in focus as the background appears blurry throughout the movement. We apply this effect to our photo by moving our eyes (camera) with the the subject (taxi). 

Panning works most effectively when a subject is moving perpendicular to your frame of reference (i.e. side to side). What is the optimal shutter speed to achieve this effect? The answer really depends on two things: the focal length and the speed of the subject. Both of these factors affect how quickly motion appears in frame. To keep it simple, lets assume a focal length of 35mm on a full frame camera. A shutter speed between 1/30 and 1/125 generally works for passing cars, bikes, etc. In this photo the taxi is driving relatively slowly (as one should in a blizzard!); I used a Canon EF 24-70 f/2.8L II lens with a focal length of 50mm and shutter speed 1/40. As a bonus, the taxi is driving upwind and in the opposite direction of the falling snow. This adds an enhanced sense of movement to the image.

The easiest way to practice panning is to stand on a sidewalk and photograph passing cars. If your camera supports burst mode or hi-speed shooting you should enable this setting. Select Shutter Priority or Manual mode and start with a shutter speed of 1/60. Hold your camera at eye level and tuck your elbows in against your sides. (You can also use a tripod and panning head, but I suggest learning to do this hand-held). As a car approaches from the side, turn your entire torso toward the car, focus, and begin turning your core as the car passes. Practice turning your body at a speed so that the car remains in the same part of the frame throughout. Do this a few times before taking any shots. When you are ready, pan and hold down your shutter button to take multiple shots as a car passes. Be sure to press your shutter button before the subject is directly in front of you - you'll miss the shot if you wait until the subject is in front of you to begin shooting. The goal is to have the car in focus and the background blurry. If both appear relatively sharp, your shutter speed is too fast. If both are blurry your shutter speed may be too slow. If the car’s position in the frame is inconsistent, you need to fine tune the speed at which you're  turning. Panning is a complex technique that will take practice, so don’t be discouraged if it takes a while. One final note of caution: always pick a safe place from which to attempt this technique. Do not stand in the street and always be aware of your surroundings! 

Want to learn more about motion blur? Check out these 10 Great Tips to Capture Unique Motion Blur Photos.

FOCUS
On my Canon 5D Mark III you have three options: One Shot, AI Focus, and AI Servo. Comparable Nikon models have similar modes. If you are panning against a busy background, using Servo mode will be effective if you lock focus on the moving vehicle properly. I often use One Shot mode and have no problem. The key is to not enable all focus points. Doing so could cause the camera to lock focus on another moving object and not your preferred subject. Limit the autofocus to no more than a few points surrounding the center of the frame.

Limit your autofocus to the points in the center of the frame. Enabling more focus points could confuse the camera's autofocus and lock onto the wrong subject, especially in an action scene. (Image courtesy: Canon USA)

Limit your autofocus to the points in the center of the frame. Enabling more focus points could confuse the camera's autofocus and lock onto the wrong subject, especially in an action scene. (Image courtesy: Canon USA)

COMPOSITION
Whenever you capture motion, the framing of the subject should help to accentuate the movement. In practical terms, you should leave room in front of and behind the subject to imply movement, sometimes with visible cues like a wake or a dust cloud. (Think of cartoons and how they suggest movement). Generally you should leave more room in front of the subject than behind to imply forward movement. 

POST-PROCESSING
In post-processing I applied two effects to achieve the final look. First, I applied a polarization filter (using Nik Collection Polarization) to make the yellows and blues pop. Second, I added a vignette to draw the eye to the center of the frame. Vignettes can be created in a number of ways and normally they darken the corners of the image, however in this instance I used a curves adjustment layer in Photoshop to lighten the corners and reduce contrast. I limited the effect to the perimeter of the image, creating a fade into the whiteout of the snow storm. 

OTHER SUBJECTS
Panning can be used to capture motion on almost any moving subject but requires certain qualities in the movement:

  1. The subject should be moving perpendicular to you - i.e left-right or right-left

  2. The subject should be moving continuously and smoothly

Practice and have fun! Try the panning technique in these situations:

  • A cyclist at the park

  • A seagull at the beach

  • A motorcycle or car on the street

  • A runner in a race

  • A waverunner or water-skier at a lake

Panning technique in Taipei, Taiwan. Scooters are so popular in this city, they are often seen driving in “swarms” or parked by the dozens.  Focal length: 70mm, Aperture: F/2.8, Shutter: 1/200, ISO: 250

Panning technique in Taipei, Taiwan. Scooters are so popular in this city, they are often seen driving in “swarms” or parked by the dozens.
Focal length: 70mm, Aperture: F/2.8, Shutter: 1/200, ISO: 250