Tutorials

Silky Smooth Water Effect

Prerequisites:

Understanding the exposure triangle

Experience in ‘Manual’ mode

You can see it in fine art photographs everywhere: a smooth, dreamy quality to a body of water. Unlike the harsh and crunchy appearance of most smartphone snapshots, the water in these fine art images takes on a fantasy-like artistic look. How do photographers get that magical silky effect? It’s actually quite simple: with a medium to long exposure, we can blur the movement of the water into a velvety texture. Today we’ll look at how exactly to “soften” moving water: the gear needed to pull off the shot, just how “long” the exposure needs to be in different situations, and some side effects and pitfalls to avoid in the process. 

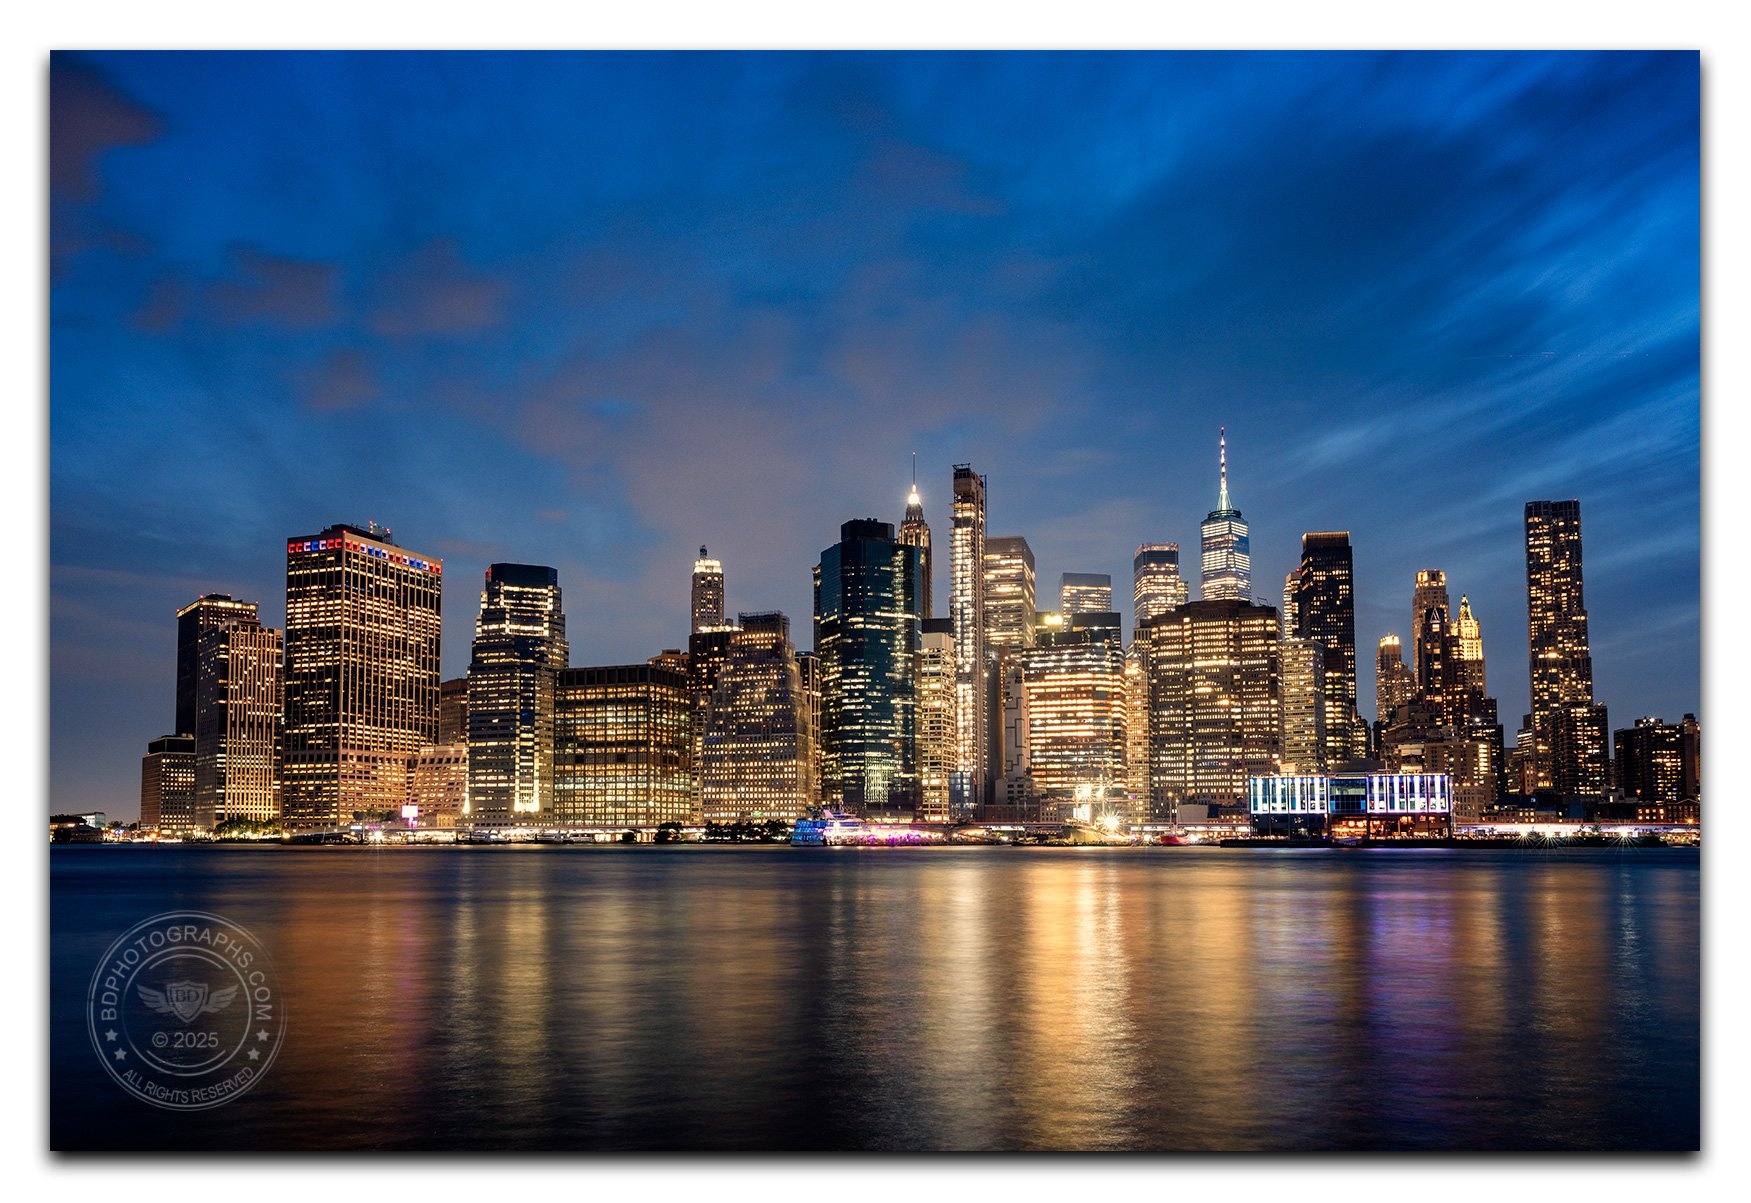
The East River in New York City is tidal and always moving, even on the calmest day. Softening the water requires a long exposure of 15 seconds or more. Notice the blurring effect the long exposure has on the moving clouds. Canon 5D III | EF 24-70 f…

The East River in New York City is tidal and always moving, even on the calmest day. Softening the water requires a long exposure of 15 seconds or more. Notice the blurring effect the long exposure has on the moving clouds. Canon 5D III | EF 24-70 f/2.8L II | Aperture f/16 | Shutter 60” | ISO 100

GEAR

The technique to soften water is in controlling the shutter speed and the most important item aside from your camera and lens is a sturdy tripod. You may also want to bring a polarizer and a neutral density filter, especially for daytime shots. A remote shutter trigger is a convenient tool and a back-saving device when your camera is positioned low to the ground. Finally, a rain cover for your camera is good idea when shooting by water — especially near waterfalls or breaking waves. 

HOW LONG IS “LONG”? 

Sure, we know the trick to softening water is in a slow shutter speed and long exposure but what exactly do we mean by “long”? That answer really depends on a number of variables, but as a rule of thumb, any shutter speed that is too slow for a hand-held in-focus shot can be considered a long exposure. I can see some of you rolling your eyes — “just give me a number!” — so for the sake of simplicity let’s say 1/15 of a second up to 1 second is a medium length exposure, and anything over 1 second is “long”. 


“That’s quite a range” (another eye roll) — it sure is, and there’s a certain amount of experimentation needed to arrive at the optimal shutter speed for a given shot. It’s also the case that two exposures of the same scene can look quite different even at the same shutter speed.

TECHNIQUE

A good tripod is essential to pulling this off, so ensure your camera is mounted and stable before you begin. Put your camera in manual mode and set the aperture to a narrow f-stop such as f/16 or f/22. Set your ISO to its lowest native setting (100 for most Canon cameras; 64, 100, or 160 for different Nikon bodies). Evaluate how fast the water is moving relative to the camera and dial in a shutter speed of a few seconds to start. Look at your exposure meter — if the scene is underexposed, you can open the aperture a bit wider or increase the ISO. If the scene is overexposed, shorten the shutter time a bit. In bright daytime scenes it may be necessary to use a neutral density filter in order to achieve the desired shutter speed. Adjust the shutter speed until the water is softened to taste. Take several exposures and choose the best one.

The “crunchy” water look is typical of smartphones and cameras in Automatic mode. The camera is shooting with a fast shutter speed in order to ensure a sharp image — which is the right thing to do in most situations. It doesn’t know we want an artis…

The “crunchy” water look is typical of smartphones and cameras in Automatic mode. The camera is shooting with a fast shutter speed in order to ensure a sharp image — which is the right thing to do in most situations. It doesn’t know we want an artistic effect in the water. Sony QX100 with iPhone | Aperture f/4 | Shutter 1/640 | ISO 160

The key to softening water is to understand how quickly the water is moving relative to your point of view. When the relative movement is fast, you don’t need as long of an exposure because you capture more movement (and thus blur) in a given amount of time. When the water movement is slow, a longer shutter speed is required to smooth out the texture. Be careful to consider the relative movement of the water, not the objective speed. For example, a moderately flowing stream might be visually quite rapid if you position the camera low and close to the water. In other words, the water moves across the frame quickly. On the other hand, a lake in the background of the image could be churning in the wind, but because of it’s distance, the water is not moving much at all relative to your point of view. This would require a lengthier exposure. 

Fibrous streaks are a variation of softened water. In this image the camera is positioned on the bank low and just inches from the gushing stream. A modest shutter speed of 1/5 of a second is all it takes to achieve the silky tendrils in the image. …

Fibrous streaks are a variation of softened water. In this image the camera is positioned on the bank low and just inches from the gushing stream. A modest shutter speed of 1/5 of a second is all it takes to achieve the silky tendrils in the image. A CPL filter (aka circular polarizer) will help to reduce the reflective glare on wet rocks. Canon 5DSR | EF 24-70 f/2.8L II | Aperture f/22 | Shutter 1/5” | ISO 100 | B&W Circular Polarizer

Sometimes we prefer a more fibrous look to the water, especially in rapids and waterfalls. The recipe for this effect is still in the shutter speed, but in this case longer is not necessarily better. You want to blur the water just enough to soften the crunchy look at you would achieve with a fast shutter speed. A medium shutter speed — somewhere between 1/15 and 1 second will usually produce this effect. 

Less is more: a long exposure will turn the stream into a milky mess and potentially blow out the highlights. This image was shot with a 1 second exposure — not especially long — and has already exceeded the ideal shutter speed. The mill is well exp…

Less is more: a long exposure will turn the stream into a milky mess and potentially blow out the highlights. This image was shot with a 1 second exposure — not especially long — and has already exceeded the ideal shutter speed. The mill is well exposed but the water is too frothy and some of the trees in the background show motion blur. Sony A7RII | 24-70mm f/4 | Aperture f/22 | Shutter 1” | ISO 100

SIDE EFFECTS

Long exposures can sometimes result in odd or undesirable effects in images. Remember that a long exposure will create motion blur — this is how we soften water — and that blur will affect any moving object in the image. On a windy day bushes and trees will sway, along with flags, traffic lights, boats, and even skyscrapers! Moving cars will appear as streaks of white and red when their lights are on. And clouds will lose their shape and become foggy strokes of whitish gray (sometimes this adds to the dreamy effect we achieve in softened water). There is a relatively easy way to control these unwanted effects, but it requires some work in post processing. First take the photo at the desired shutter speed to properly soften the water. Then, take a second photo with a much faster shutter speed (you will have to increase your ISO and/or widen your aperture) to ensure there is no unwanted blur in the trees / boats / moving items. Combine the two images in post processing. 

Remember that softening water is an artistic technique that deliberately stretches the shutter speed. Have fun experimenting and soon you’ll enjoy the pleasing and professional looking images you create.

The Shot: Railroad Village

The Shot: Railroad Village
Location: Taiwan
Techniques: Hand-held shooting, shutter speed, weather
Recommended knowledge: Understand the exposure triangle. Manual mode: setting your camera’s aperture, shutter speed, and ISO. 


The final shot. The historic town of Shifen is about a 40-minute drive from Taipei

The final shot. The historic town of Shifen is about a 40-minute drive from Taipei

If you bring your camera with you in your travels - whether it’s an overseas vacation or a day trip to a local park - it’s likely that you’ll be without your tripod for at least some of the time. Sometimes it’s not feasible to carry a tripod, especially in a place where it’s simply not permitted to do so (museums, churches, etc.). Or maybe you’ll opt to leave the tripod at home and lighten your load. Street photographers work almost exclusively without tripods, as do many photojournalists and some portrait photographers. Even if you’re a landscape photographer with unshakeable allegiance to the three-legged stabilizer, hand-held shooting is an important skill to learn for those unplanned moments when a tripod isn’t set up or available. 

FORM

The two most important technical considerations in hand-held photography are form and camera settings. In general, you’ll want to hold the camera with two hands and keep your elbows tucked in. The idea is to keep the camera stabilized with your body, effectively weighing it down. You’ve probably seen photographers hold the camera in one extended hand, using the display screen to focus, as they rattle off a bunch of shots. This is about looking cool while taking pictures but does nothing to improve the photo, and for most people will lead to poor results. If you are a portrait photographer using flash and fast shutter speed you could use this technique to look slick, and possibly to put your subjects at ease with a more easy-going posture, but for environmental shots using natural light I’d recommend going old-school: use two hands, look through the view finder, and hold a tight (but relaxed), stable stance. You won’t look as cool taking the photo, but you’ll get the better shot.  

HAND-HELD RULE

You might know the rule of thumb to use a minimum shutter speed of 1 over the focal length. For example, if you’re shooting with a 50mm lens (on a full frame camera such as a Canon 5DSR), a shutter speed of 1/50 is the slowest recommended speed for a reasonably sharp photograph. (If you’re using a crop frame camera you need to first factor in how the crop factor affects focal length. For example a Canon 7D Mark II or a Canon Rebel T7i both have a crop factor of 1.6 which effectively magnifies the image by that amount. So a 50mm lens becomes 80mm - i.e. 50 x 1.6 = 80. In this case the minimum shutter speed is 1/80. Ok, no more math, I promise!) Let’s look at an example and see how this works in practice. We’ll assume that we do not want any creative blur and would like the photo sharp throughout. 

Our location is the former mining town of Shifen, Taiwan. A slow moving train passes right through the center of the village, as it has for nearly 100 years, but these days it is carrying tourists, not coal. We’re using a Canon EF 24-70mm lens, which is my primary workhorse lens for travel photography.  We’ll use a focal length of 70mm for an image of the train passing through the colorful main street - it’s safest to keep some distance from the tracks and zoom in. Notably, this lens does not have built-in image stabilization, so it’s a good test of the hand-held rule. Based on the focal length of 70mm, our shutter speed is 1/80 (the nearest increment to 1/70), and it produces a decent image. If we zoom in however, many parts of the image are soft, and the moving train is outright blurry. No amount of post-process sharpening will make this image usable in any reasonably large size. The best we can do is process this image for low resolution use, such as Instagram (or a photography blog!)

Our first attempt might be Insta-ready but it won’t cut it for a larger size image. The train simply is not sharp (our desired look), nor does it have much motion blur (an alternative look). It's neither here nor there. (Aperture: f/8.0, Shutter: 1/…

Our first attempt might be Insta-ready but it won’t cut it for a larger size image. The train simply is not sharp (our desired look), nor does it have much motion blur (an alternative look). It's neither here nor there. (Aperture: f/8.0, Shutter: 1/80, ISO: 320)

Luckily, we’re going to get another crack at it, because the train that just passed through town is going back in the opposite direction shortly. This time we are going to increase the shutter speed to 1/320. The shorter exposure requires us to let in more light, but we don’t want to widen the aperture because this will create too shallow a depth of field. Instead, we’ll meter the scene and take a few test shots with a higher ISO while waiting for the train to return. And here’s what’s key: 1) if you have time, take a few test shots to get the exposure right before the scene unfolds. 2) Don’t force a low ISO shot at the expense of sharpness. It’s true that higher ISO introduces more noise, but today’s cameras produce clean images at higher ISO and there’s always the possibility to reduce noise in post-processing. In this instance a low ISO 100 shot requires either too slow a shutter speed or too wide an aperture for this scene… so we’ll go with ISO 1000, f/8 and shutter 1/320.  

PHOTOGRAPHY IN THE RAIN

We’ve got some other challenges too. It is raining and we need to keep our lens dry. You should always keep a UV filter on to protect the lens when shooting hand-held except in very specific situations. A lens hood is very effective in all but the heaviest rain. If you’ve got a weather sealed camera and lens, light rain or snow won’t be a problem, but it’s still a good idea to keep your gear dry. Buy a lens coat and if you don’t have one, improvise: a plastic bag will help in a pinch. 

Now let’s look at the result. Much sharper! You can easily read the numbers on the train.

This is a crop of the train magnified to 200%. (Aperture: f/8.0, Shutter: 1/320, ISO: 1000) Minor noise-reduction was applied using Topaz DeNoise.

This is a crop of the train magnified to 200%. (Aperture: f/8.0, Shutter: 1/320, ISO: 1000) Minor noise-reduction was applied using Topaz DeNoise.

It turns out the hand-held rule is a guideline, not a prescription. There are many factors which would require you to keep a faster shutter speed than 1 over the focal length. Let’s review some of them:

  • Camera Shake Part I: Note whether your lens includes image stabilization. If it does not, increase your minimum shutter speed.

  • Camera Shake Part II: Consider your technical ability. Are you experienced shooting hand-held and have you practiced the skill recently? Bump up your shutter speed if you’re rusty, and feel no shame about it.

  • Situational Awareness: Evaluate the shooting situation. Are you calmly waiting for a moment, or did you just run to catch an unfolding scene, and your heart is pounding from the exercise and adrenaline? Can you pull off a stable hand-held shot? In high energy situations, crowded places, or bad weather this is unlikely, and you should raise your minimum shutter speed to compensate.

  • Moving Subjects: Visualize the scene. Are you freezing moving subjects, or capturing a still life scene? Even slow moving subjects require a shutter speed greater than the hand-held minimum. Faster subjects need even faster shutter speeds. And remember that stationary subjects are not always still (i.e. trees on a windy day.)

An example of a blown shot. I hand-held a Canon 1DX Mark II with a 600mm lens for this shot (mistake number one - hand-held shots with very long lenses are very difficult to pull off), and thought if I used a shutter speed of 1/1600 that should be p…

An example of a blown shot. I hand-held a Canon 1DX Mark II with a 600mm lens for this shot (mistake number one - hand-held shots with very long lenses are very difficult to pull off), and thought if I used a shutter speed of 1/1600 that should be plenty fast since the hand-held rule would call for only 1/600 right? Not even close. The eagle’s eyes are not sharp - which makes this shot unusable, except to demonstrate an unusable shot 😀 To get this right, the ideal shutter speed would have been 1/3200. On a tripod and gimbal, with image stabilization, steady hands, and good panning technique, 1/2500 might work. Maybe.

I have missed plenty of opportunities to capture portfolio shots because I underestimated the shutter speed needed for a sharp image. Like any photographic skill, hand-held photography takes practice and is a combination of art and science. Most importantly, go out there and have fun while you learn.

The Shot: The Blizzard Taxi

The Shot: The Blizzard Taxi
Techniques: Panning
Skill Level: Intermediate
Location: New York City
Recommended knowledge: Setting your camera’s aperture, shutter speed, and ISO. Changing the autofocus mode and setting autofocus point. Enabling hi-speed or burst mode.

Focal length: 50mm, Aperture: F/2.8, Shutter: 1/40, ISO: 200

Focal length: 50mm, Aperture: F/2.8, Shutter: 1/40, ISO: 200

Even in depths of winter New York City just does not stop going. With this shot we’ll capture the action of New York in a snowstorm. The obvious subject is a moving taxi, but equally compelling is the falling snow and blustery weather. Shooting this image relies on the panning technique and using shutter speed as an artistic tool. We’ll frame color against a neutral background and washout the canvas with a vignette to further draw the eye to the main part of the image. 

SHUTTER SPEED
If you have a strong understanding of shutter speed feel free to skip this section. If this is new to you or you’d like a refresher, let’s review: the shutter speed of the camera controls how long the shutter is open to allow light to travel in to the camera’s sensor. The longer the shutter speed, the more light enters the frame. If the shutter speed is too fast, not enough light enters and the photo is underexposed; too slow, and the photo will be overexposed. When you photograph a stationary scene, shutter speed affects only the exposure and does not impact the appearance of the subject. 

Shutter speed can also be used to control the appearance of motion in an image. A fast shutter speed will “freeze” motion and appear as a crisp moment in time. With a slow shutter speed, motion will appear more fluid and blurry. In a very long exposure, motion may appear as a trail, or may disappear completely from the frame. All of these shutter speeds have applications in photography depending on the desired effect. In this image, the goal is to capture motion with a moderate blur. If we were to hold the camera stationary (or use a tripod) using a medium shutter speed, the passing taxicab would appear blurry against a sharp background as the camera captures a short distance of motion. However, in this image, using the panning technique we will reverse the effect by capturing the taxicab sharply and blurring our background. This is a popular look in auto racing and sports photography. It’s also common in nature photography, especially for birds in flight. As a bonus, the shutter speed will also blur and illustrate the movement of the falling snow.

PANNING 
Panning is not difficult, but it takes practice and requires an understanding of shutter speed to give the desired results. To illustrate what we will accomplish with panning, let’s use a simple example. Hold a pen or pencil at eye level, about 8-12 inches diagonally in front your right ear. Look straight ahead and take note of what is in the background (it could be a wall in your home). Now continue to look straight at the background ahead and move the pen across from right to left so that it stops 8-12 inches diagonally in front of your left ear. The entire motion should take 1 to 2 seconds. Notice that the pen appears blurry and the background remains sharp. This is what a medium shutter speed would capture when the camera is stationary - for example a camera on a tripod as a taxi cab passes from right to left.  (If you find that the pen was sharp and the background was blurry you’ve unknowingly used the panning technique. Let’s try it officially now.)

The traditional use of shutter speed to create motion blur. In this image, the camera is stationary on a tripod, keeping our background still while blurring moving subjects. In panning, the opposite effect is achieved. I used a tilt-shift lens in th…

The traditional use of shutter speed to create motion blur. In this image, the camera is stationary on a tripod, keeping our background still while blurring moving subjects. In panning, the opposite effect is achieved. I used a tilt-shift lens in this shot, but any lens can achieve motion blur at the right shutter speed.
Focal length: 24mm, Aperture: F/14, Shutter: 1/15, ISO: 100

Now we are going to reverse the effect. Hold the pen at a diagonal 8-12 inches from your right ear at eye level. This time, turn your head to the right so that you are looking directly at the pen. Move the pen from right to left, just as before but this time follow the pen by turning your head at the same speed so that you are always looking straight at the pen as it moves. Notice the pen remains in focus as the background appears blurry throughout the movement. We apply this effect to our photo by moving our eyes (camera) with the the subject (taxi). 

Panning works most effectively when a subject is moving perpendicular to your frame of reference (i.e. side to side). What is the optimal shutter speed to achieve this effect? The answer really depends on two things: the focal length and the speed of the subject. Both of these factors affect how quickly motion appears in frame. To keep it simple, lets assume a focal length of 35mm on a full frame camera. A shutter speed between 1/30 and 1/125 generally works for passing cars, bikes, etc. In this photo the taxi is driving relatively slowly (as one should in a blizzard!); I used a Canon EF 24-70 f/2.8L II lens with a focal length of 50mm and shutter speed 1/40. As a bonus, the taxi is driving upwind and in the opposite direction of the falling snow. This adds an enhanced sense of movement to the image.

The easiest way to practice panning is to stand on a sidewalk and photograph passing cars. If your camera supports burst mode or hi-speed shooting you should enable this setting. Select Shutter Priority or Manual mode and start with a shutter speed of 1/60. Hold your camera at eye level and tuck your elbows in against your sides. (You can also use a tripod and panning head, but I suggest learning to do this hand-held). As a car approaches from the side, turn your entire torso toward the car, focus, and begin turning your core as the car passes. Practice turning your body at a speed so that the car remains in the same part of the frame throughout. Do this a few times before taking any shots. When you are ready, pan and hold down your shutter button to take multiple shots as a car passes. Be sure to press your shutter button before the subject is directly in front of you - you'll miss the shot if you wait until the subject is in front of you to begin shooting. The goal is to have the car in focus and the background blurry. If both appear relatively sharp, your shutter speed is too fast. If both are blurry your shutter speed may be too slow. If the car’s position in the frame is inconsistent, you need to fine tune the speed at which you're  turning. Panning is a complex technique that will take practice, so don’t be discouraged if it takes a while. One final note of caution: always pick a safe place from which to attempt this technique. Do not stand in the street and always be aware of your surroundings! 

Want to learn more about motion blur? Check out these 10 Great Tips to Capture Unique Motion Blur Photos.

FOCUS
On my Canon 5D Mark III you have three options: One Shot, AI Focus, and AI Servo. Comparable Nikon models have similar modes. If you are panning against a busy background, using Servo mode will be effective if you lock focus on the moving vehicle properly. I often use One Shot mode and have no problem. The key is to not enable all focus points. Doing so could cause the camera to lock focus on another moving object and not your preferred subject. Limit the autofocus to no more than a few points surrounding the center of the frame.

Limit your autofocus to the points in the center of the frame. Enabling more focus points could confuse the camera's autofocus and lock onto the wrong subject, especially in an action scene. (Image courtesy: Canon USA)

Limit your autofocus to the points in the center of the frame. Enabling more focus points could confuse the camera's autofocus and lock onto the wrong subject, especially in an action scene. (Image courtesy: Canon USA)

COMPOSITION
Whenever you capture motion, the framing of the subject should help to accentuate the movement. In practical terms, you should leave room in front of and behind the subject to imply movement, sometimes with visible cues like a wake or a dust cloud. (Think of cartoons and how they suggest movement). Generally you should leave more room in front of the subject than behind to imply forward movement. 

POST-PROCESSING
In post-processing I applied two effects to achieve the final look. First, I applied a polarization filter (using Nik Collection Polarization) to make the yellows and blues pop. Second, I added a vignette to draw the eye to the center of the frame. Vignettes can be created in a number of ways and normally they darken the corners of the image, however in this instance I used a curves adjustment layer in Photoshop to lighten the corners and reduce contrast. I limited the effect to the perimeter of the image, creating a fade into the whiteout of the snow storm. 

OTHER SUBJECTS
Panning can be used to capture motion on almost any moving subject but requires certain qualities in the movement:

  1. The subject should be moving perpendicular to you - i.e left-right or right-left

  2. The subject should be moving continuously and smoothly

Practice and have fun! Try the panning technique in these situations:

  • A cyclist at the park

  • A seagull at the beach

  • A motorcycle or car on the street

  • A runner in a race

  • A waverunner or water-skier at a lake

Panning technique in Taipei, Taiwan. Scooters are so popular in this city, they are often seen driving in “swarms” or parked by the dozens.  Focal length: 70mm, Aperture: F/2.8, Shutter: 1/200, ISO: 250

Panning technique in Taipei, Taiwan. Scooters are so popular in this city, they are often seen driving in “swarms” or parked by the dozens.
Focal length: 70mm, Aperture: F/2.8, Shutter: 1/200, ISO: 250

The Shot: Rock Trails

The Shot: Rock Trails
Location: Death Valley, California
Skill Level: Intermediate
Techniques: Scouting and preparation, wide-angle photography
Recommended knowledge: Setting your camera’s aperture, shutter speed, and ISO. Changing the autofocus point. 


Quite often the majority of the work required to make an image occurs before the camera ever snaps a shot. In this post we’ll take a bouncy ride out to one of the more remote spots on the continent to catch the short but beautiful moment before sunset known as “golden hour”. 

OUR DESTINATION
Racetrack Playa in Death Valley National Park is a unique location famous for its mysterious “moving” rocks. Along the scaly texture of a dry lakebed, rocks dot the surface with tell-tale and seemingly impossible trails in their wake (more on how this phenomenon occurs later). I had seen photos of this location, mostly taken in mid-daylight hours, and decided to attempt a golden hour shot. 

TRAVEL
The most difficult part of capturing an image like this is actually getting there. Death Valley National Park is remote (four hours drive from Los Angeles and two from Las Vegas), and Racetrack Playa is relatively deep in a secluded part of the park. For seven months of the year the average temperature high is greater than 90°F (32°C) making it one of the most inhospitable locations to visit in the United States. From the visitor’s center in the park, it is an 83 mile drive including 27 miles on a rough single-lane dirt road. That may not seem like much, but the rugged washboard prevents travel speeds more than about 15-20 miles per hour. In all, the dirt road portion of the drive it is about one and a half hours of non-stop bouncing and rattling. Be sure to have your gear stowed in protective padding (and book an appointment with your chiropractor). I’d definitely advise against attempting this drive in a car unless it has sufficient clearance, solid 4-wheel drive (not the same as all-wheel drive), high tolerance for off-road abuse, and a good spare tire. Many visitors rent Jeeps fitted for off-road use.  

The route from the Furnace Creek Visitor’s Center. West of Grapevine Peak the drive switches from paved to dirt roads. Expect to be on the dirt roads for about 1.5 hours at speeds no greater than 20mph. (courtesy: Google Maps)

The route from the Furnace Creek Visitor’s Center. West of Grapevine Peak the drive switches from paved to dirt roads. Expect to be on the dirt roads for about 1.5 hours at speeds no greater than 20mph. (courtesy: Google Maps)

SCOUTING
Once at the playa, and after a good stretch of the arms and legs, I ventured out onto the playa itself. Common sense (and park rules) prohibits driving onto the playa - there is ample parking at the end of the dirt road. Sadly, much of the playa was defaced in 2016 by joyriding morons. Instead of rock trails, visitors were left with criss-crossing ugly black tire marks. It could take years before there is enough rainfall to wash away the damage. Locals told me this is not the first such incident and that the park may admit future visitors to the playa by permit only, or not at all. This is why we can’t have nice things.

For a golden hour shot, it’s important to arrive well in advance of sunset to find the right composition, read the light, and set up your gear. You should also research the direction of the sunset to help decide whether you want a back-lit, front-lit, or side-lit shot. Suncalc.net is a free resource for determining the direction of sunrise and sunset. Popular smartphone apps include The Photographer’s Ephemeris and Photopills (more on how to use these apps in a different blog post). Early arrival at the site will also allow you to take some time to explore and simply enjoy the experience - something that will be more difficult when you’re focused on photography during the fleeting moments of golden hour. Part of the fun here is searching the area and choosing your favorite rock and composition. With a short while before golden hour, it’s time to set up the tripod and take some test shots.


I use Adobe Photoshop and Lightroom to process all my images. Try them for free using this link.


TECHNIQUE
Wide Angle shots: For a dramatic close-up of the subject, choose a wide angle lens and set up low and very close to the rock. I used a Canon EF 16-35mm f/4 lens on my Canon 5D Mark III for this image. Wide angle lenses exaggerate and distort the size of anything near the lens, while diminishing the scale of more distant objects. 

Focus stacking: In this type of shot, even with a narrow aperture (f/22) there may not be enough depth of field to achieve sharp focus of the foreground and background in a single exposure. To compensate for the limited depth of field, photographers sometimes use a focus stacking technique (combining multiple exposures each with a different focal point - e.g. one that focuses on the foreground, a second on the middle ground, and a third on the background. More on that in a different post). We’ll keep things simple, and in my case I did so out of necessity. Because I arrived later than expected, there wouldn’t be much time before the sun dipped below the mountains to the west, and the golden light would disappear. 

Narrow aperture: If you are going to achieve focus in one exposure, make sure to dial back the aperture to f/16 or narrower, focused on the foreground subject. If you are too close to the rock, you’ll need to focus stack in order to achieve sharpness throughout. Because you’ll be using a relatively narrow aperture in diminishing light, you’ll need to compensate with shutter speed and/or ISO for a proper exposure. (Need to brush up on exposure and how aperture, shutter speed and ISO work?) Remember that a longer shutter speed will cause moving objects (e.g. moving clouds, blowing sand) to appear blurry or as streaks. This can be a very pleasing effect, but if it’s not what you desire, and you prefer to keep moving clouds sharp you’ll need to limit shutter speed and compensate by raising the ISO. 

Focus: For a single shot, keep the autofocus point on the foreground subject. If the camera is on a steady tripod, turn off image-stabilization (vibration reduction) on the lens if possible. Only keep it enabled if conditions are very windy.

Exposure: use your histogram to ensure highlights are not blown out, especially the sunlight on the mountains. Use bracketing or HDR if desired (if you are not shooting in the direction of the sun this should not be required.)

Positioning: Keep your camera height below or on the same horizontal plane as your subject to achieve a dramatic effect. Most rocks are not more than one foot in height, so you’ll need to be low. A tripod is needed for this type of shot due to the low light and potential slow shutter speed. It’s also hard on the knees and back to get down that low - let the tripod do the crouching and use a remote to trigger the shutter. 


Interested in photography gear and supporting small business? Check out Adorama


Perspective and lighting make all the difference. In this shot the camera is on a tripod roughly three feet in elevation and the golden light has disappeared behind the mountains. The rock looks small and the light is flat. For the portfolio shot, t…

Perspective and lighting make all the difference. In this shot the camera is on a tripod roughly three feet in elevation and the golden light has disappeared behind the mountains. The rock looks small and the light is flat. For the portfolio shot, the camera was less than a foot off the ground and the sunlight was almost horizontal from the west, giving us a golden light quality and long shadows.

FINAL THOUGHTS
Use your judgment about what can be achieved in the time that you have and remember that it’s better to take more pictures than you need. Golden “hour” is variable in length depending on where you are (latitude) and the time of year - but the blue hour following sunset (or preceding sunrise) can be just as magical - so don’t pack up too early. At the playa remember to seek out more than one rock and alternate compositions! When you return to your hotel or campsite, after the long bouncy ride, put your feet up, have your favorite beverage, and review your photos - I like to rate my favorite ones in camera or in Adobe Lightroom. Then sleep on it and pick your finalists afterward. 

Some additional considerations: Racetrack Playa is a special place and worth the trek. Before visiting this location, consider weather conditions (especially if there is rain or flash flooding in the forecast, or in the heat of the summer months), research driving options, pack enough water (then double that amount), bring warm clothing in winter, and tell someone where you’re going and when you’ll be back. Bring a flashlight (or two), batteries, and GPS. Travel with a companion (the human kind). As in most desert locations, dust and sand can be a problem and won’t play nicely with electronics. If shooting with a DSLR or mirrorless camera, choose your lens and mount it to the camera body before you pack your gear, then leave your gear packed until you arrive.

SUMMARY

  • Plan the shot with directions, time of day, and logistics

  • Research the time and direction of sunset

  • Check the weather forecast

  • Bring a friend and tell someone where you’re going and when you expect to return

  • Pack the essentials including water, sunscreen, proper attire, flashlight, extra batteries and a first aid kit

  • Arrive early and walk around for a while until you find a composition you like

  • Get close to your subject and on the same horizontal plane

  • Dial back (stop-down) your aperture to ensure a greater depth of field (i.e. keep everything in focus)

Feeling accomplished during blue hour. Unlike our wide-angle close-up, the rocks don’t look very big when photographed from this perspective.

Feeling accomplished during blue hour. Unlike our wide-angle close-up, the rocks don’t look very big when photographed from this perspective.

MYSTERY
I almost forgot - what about the mysterious moving rocks themselves? People have theorized that gale-force winds move them, while the less-scientifically inclined envisioned ghosts or aliens. Until recently, we did not have a definitive answer. This video explains the mystery. Enjoy!


Interested in starting a website or blog? How about a place to display your photos online? I use Squarespace as my platform. Get started for free — click the image below.